I recently re-leveled my tiny house after some settling had occurred over the past few years. I had noticed that my sink wasn’t draining all the way and it tipped me off that the house might be a little out of kilter. So this time around I ended up changing from jack stands to cement blocks and adding more of them so I had a more stable foundation and in the end my entry way was a good bit further off the ground.
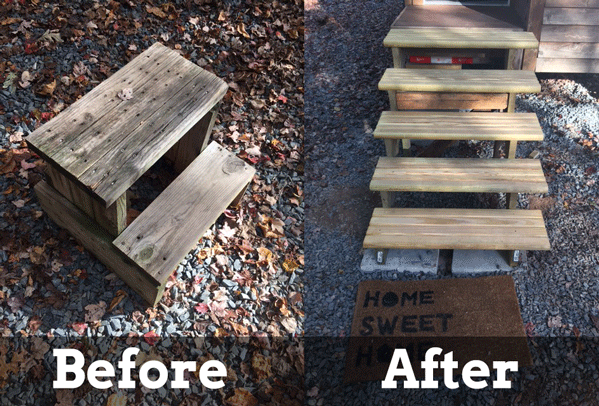
I decided to have a permanent set of steps that was actually tied to the house, not something I could just pick up and go. I discovered at my local big box hardware store that they had these stair kits. Basically pre-cut stringers and milled treads that took all the guess work out of it.
When I found them I was surprised how inexpensive they were and for only $9 each, they took all the guess work out of me needing to figure out the complex angles, something I had been dreading. The treads were around $8 each, but they were nicely milled and the best part, they were designed to fit the stringers perfectly. So for $58 I had the full kit for my stairs without needing to figure out a single angle or make a single cut! I was sold!
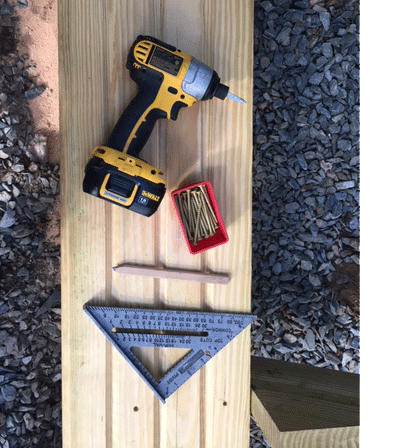
The Tools:
- Impact Driver
- Speed Square
- Carpenter Pencil
- Ext. self tapping screws
- Tico hanger nails
- Palm nailer
- Shovel
- Level
Next I dug down to solid dirt and placed two solid blocks, leveled them with sand and then laid the stringers. After about 30 minutes of fiddling with it I was able to get the blocks, the stringer and the house to all be perfectly aligned. A quick check with my level and I was off to attach the stringer to the house itself.
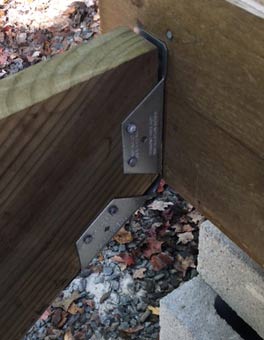
To do so I used these flexible angle hangers to firmly attach it to the house. I was fortunate that behind my trim was 3 inches of solid wood to mount into. So I got the hangers mounted and then attached the stringers to the brackets with “tico nails” which are galvanized beefy nails that are designed to be used with these metal brackets (very important that you use the right nail to prevent corrosion).
I used this palm nailer for this and shot a quick video showing you how it works because most people haven’t ever heard of this tool.
One I got the bracket nailed in, I nailed the stringers in place, you can see it here:
I rechecked my level, made sure the stringers were going straight out from the house with my speed square and then I started installing the bottom stair. I did this because I knew the top of the stair was straight and level where I attached it, by doing the bottom stair, I could ensure it was straight and level too.
What this meant was if the bottom and top were all good, everything else would be good to go in between. If the set of stairs had been a longer run, I may have done a little more checking because the longer the board, the greater the warp comes into play. On this short of a run I wasn’t going to worry about it.
It was here where I decided to add an extra brace in as a redundant support because I’ve never build any stairs before and I just didn’t want to have to worry about it.
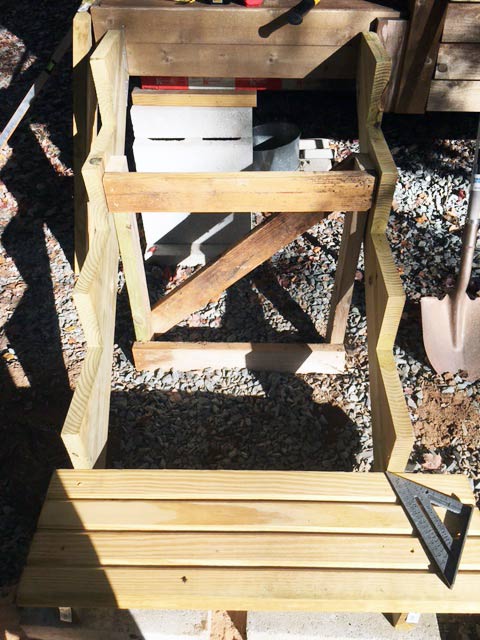
After I finished all the bracing, way over-engineering it, I dropped in the remaining treads. Now before someone points it out, my treads aren’t even on purpose. The left side I aligned the overhang so that it aligned with the outside edge of my house. I could have cut the treads to match the offset on both sides, but I liked the look and it allowed me to have places to put potted plants on the side without obstructing the main walkway.
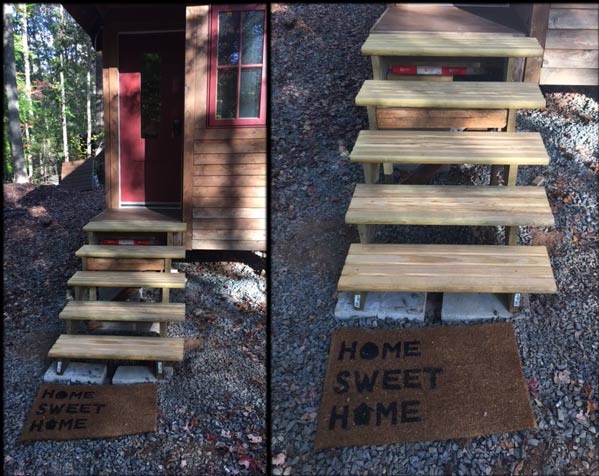
A little tidying up and a new welcome mat and I had a nice looking set of stairs!
Your Turn!
- What projects are you looking forward to on your tiny house?
I have a question for you! Does one need to have a great credit score to buy a tiny house and live in one? Thank you!!