
NAVIGATION
Tiny house plumbing can seem daunting at first. I know when I built my tiny house, it seemed that way. But what I came to realize after learning a few tricks about how plumbing works in a tiny house is that it isn’t as hard as it first seems.
So, in this guide, I wanted to lay out how to install plumbing in your tiny house, how to connect things like a shower, sink, and toilet, and considerations around water tanks if you want to take your tiny house on the road. I’ll also dig into some of the costs to install plumbing into a tiny house as a DIYer and if you decide to hire a plumber.
Hi, I’m Ryan
The great thing about tiny house plumbing is that because your home is so small, the plumbing can be super easy to execute. So take the time to plan ahead and try not to overcomplicate things or use unnecessarily long runs.

How Does Tiny House Plumbing Work?
There are three main differences between traditional and tiny home plumbing: how the water comes into the house, dealing with a trailer, and the optional on-board water tank.
Much like a traditional home, you’re going to have your water supply come into the house, then it usually forks, one line to the hot water heater, the other direct to your sink and shower. The line coming out of the hot water heater will then be your hot supply to your sink and shower.
And of course, what comes in must go out. So once you’ve used that freshwater, the resulting wastewater is carried away from your tiny home by a series of drainpipes that might empty out into a septic tank, holding tank, or a municipal sewer system. I’ll touch more on those later.
How To Plumb A Tiny House
Plumbing a tiny home is a lot more approachable than you might think because, although there are a lot of moving parts, you don’t have to tackle everything at once. In fact, taking things one step at a time will go a long way in making things less overwhelming. With that in mind, I’ve broken down how to plumb a tiny house into seven easy-to-follow steps.
Step 1: Plan Your Tiny House Plumbing Layout
Every good tiny house plumbing system starts with a well-planned layout. So to begin, draft up a few plumbing layouts to help you map out where your water supply lines, drainage, water heater, vents, and fixtures will go. Really take your time with this step. You have limited space to work with, so you’ll need to make sure nothing is competing for space.
I’ll share some sample tiny house plumbing diagrams later on, but for now I really want to stress how important it is to keep your runs short and free from unnecessary bends. I’ve found that one of the easiest ways to do that is to keep your bathroom and kitchen as close to each other as possible.
By creating this “wet zone,” you can shorten the supply and drain runs and make the entire system easier to maintain. A simpler route also means fewer fittings, less labor, and a lower risk of problem areas developing.
Step 2: Rough In Fixtures
Some tiny house plumbing fixtures, like showers, tubs, and toilet flanges, need to be positioned before doing anything else. That way, the drain and water supply lines line up properly. Start by referring to the manufacturer’s instructions and marking the exact location of where each fixture will go.
Next, add the required blocking, brackets, drainage holes, and support before bringing in any tubs or shower bases that need to be in place before you add the drain piping. Remember, you aren’t installing the fixtures just yet.
You’re simply locking in where the DWV and water supply lines will go before the upcoming plumbing makes the area difficult to access.
Speaking of difficult to access areas, I like to leave a little bit of working room around fittings whenever the layout allows for it. That makes them easier to connect, tighten, and eventually service later down the line.
Step 3: Install Drain, Waste, And Vent Lines
To start your DWV (drain, waste, vent) system, figure out where each sink, shower, or toilet will go. Mark out the path each drain line will take as it connects to the main waste line, where waste will exit the house and flow into your planned waste management system. I’ll touch on the specifics of how tiny houses handle sewage further down.
Cut the drain pipes to length, and dry fit the sections to ensure everything lines up correctly. Bear in mind that, because tiny house plumbing systems rely on gravity, drainpipes have to slope downwards. Too little of a slope, and waste can build up and cause clogs, pooling, and – eventually – property damage.
On the other hand, slopes that are too steep can cause liquid waste to flow through the pipes more quickly than the solids. While this doesn’t sound like too much of an issue, it can lead to blockages and increased wear and tear.
I’ve found that a slope of ¼ of an inch per foot tends to work best, but you’ll want to double check with your local plumbing code.
Once you’re satisfied with the placement, run each individual drain line to the main waste line, and use the appropriate solvent cement to permanently join the sections. Next, install P-traps underneath each sink and shower drain.
P-traps are curved sections of pipe that hold onto small amounts of water. That creates a barrier between your living space and septic or sewer system and prevents noxious fumes from entering your tiny home. It also works as a first line of defense, trapping hair, debris, or the occasional piece of jewelry before it travels deeper into your plumbing system.
The last part of the DWV system is vent piping. Vent piping runs from your fixtures, up through the walls, and out of the roof. It helps regulate your drainage system’s air pressure, which both keeps water moving smoothly and prevents noxious fumes from building up inside of your home.
Connect the vent piping close to your sink and water traps to prevent the rushing water from creating a vacuum. I also recommend extending the exit point of the vent pipe at least 6 inches above the roofline (or higher, if you live somewhere that gets heavy snow) to prevent blockages.
Step 4: Set Up The Water Heater
After you’ve decided on a water heater, bring it to its designated location and set it on a flat, stable surface. You may need to use cinderblocks or shims to ensure it doesn’t wobble or lean to one side. Otherwise, it can place too much stress on the water lines and lead to leaks.
Then, just follow the manufacturer’s instructions to orient the heater and hook it up to your preferred power source. Keep in mind that if you go with a propane water heater like I did, you’ll need to provide adequate venting to prevent carbon monoxide from building up.
Step 5: Install Water Supply Lines
Once you have an idea of where everything will go, run water supply lines from your tiny home’s main water source to the water heater, shower, sinks, and toilet. The cold water line will serve the entire tiny house water system.
Next, go back in and run a second set of water lines from the water heater to whichever fixtures need hot water.
Remember to keep your runs as short and direct as possible and secure each line with the appropriate clamps, clips, or straps as you work. Be careful not to clamp flexible pipes too tightly, or you may distort the tubing and increase the likelihood of leaks developing.
After you finish, open the water supply and let the water heater fill completely. A leaky water heater can lead to a number of issues, ranging from mold and property damage to electrical hazards and a total system failure, so carefully inspect the tank and each connection for leaks before moving on to the next step.
Step 6: Finish Installing And Connecting The Fixtures
Here’s where all of your hard work really starts to pay off, since fixtures like sinks, toilets, bathtubs, and showers transform your tiny home plumbing project into a real, livable space. So go back to the fixtures you roughed in earlier and finish the installation process.
Once you’ve done that, move on to the fixtures that didn’t need to be roughed in earlier. That means your sinks, faucets, toilets, etc.
For the most part, I find installing fixtures to be the most straightforward part of the process. Just mount them, ensure everything is level and properly aligned with the water supply and drainage lines, and install each one using the manufacturer’s instructions.
Step 7: Test Your Tiny Home Plumbing System
With everything in place, it’s time to test the entire tiny house water system. Turn on the water supply and check every joint, seal, and connection for leaks. I recommend checking each fixture individually, so flush the toilet a few times, turn all the faucets off and on, and fill and drain your washing machine.
You want to be as thorough as possible, so really let the water flow. I know from experience that just running the sink for a few seconds won’t necessarily be enough to highlight the problem areas.
And remember, you’re doing more than just looking for leaks. You want to make sure the entire system runs as intended, so that includes making sure hot water reaches the right fixtures, checking to see if water pressure is consistent, and ensuring every drain empties freely without backing up or gurgling.
Once you’re sure there aren’t any issues, you can move on to closing up all the walls and finishing the build.

Tiny House Plumbing Diagram
If you’re anything like me, you need to see a general layout of how all the pipes and drains are laid out and connected to really understand how a tiny house plumbing system works. Here is a tiny house plumbing diagram I put together.
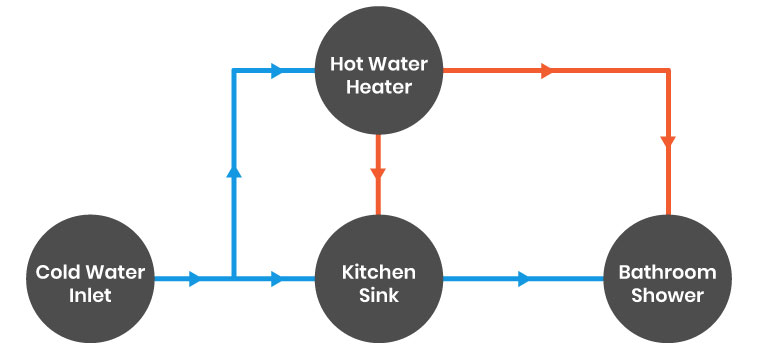
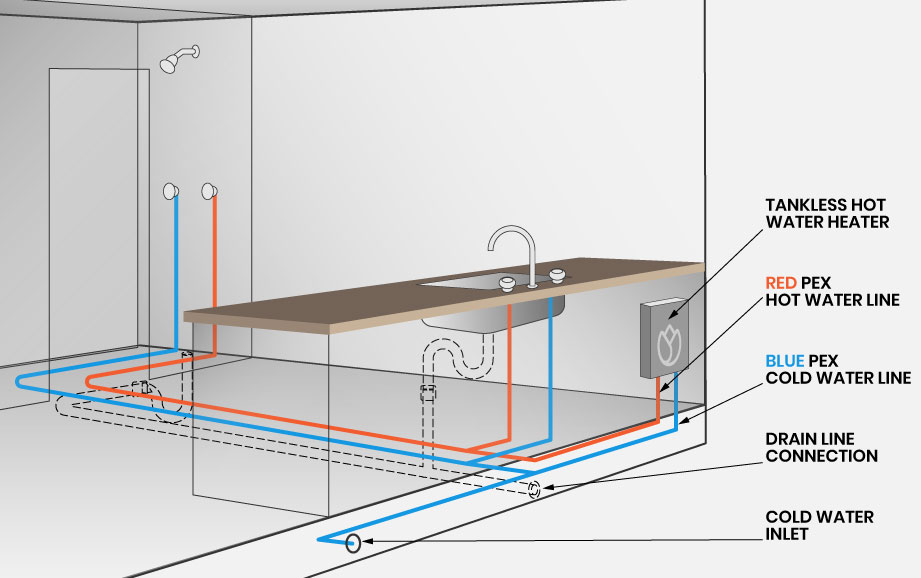
All my water supply lines were made out of PEX, which I color coded. I purchased a roll of red PEX line for hot water and my cold water line was blue colored PEX. This helped me keep things straight in my head. All my drain lines were 2-inch PVC pipes.
As you can see, the water enters my house near the tongue of my tiny house trailer. The line splits here, with the cold line going directly into my house from the bottom and the other line going up to my tankless hot water heater, which is mounted on the outside.
The cold water line entered into my house behind my kitchen cabinets where it T’ed off. The water line to the left went to the cold water line for the shower. The line to the right followed the wall, turned the corner and came up to feed its way to my sink.
The hot water followed a similar path right next to the cold water line using red PEX line.
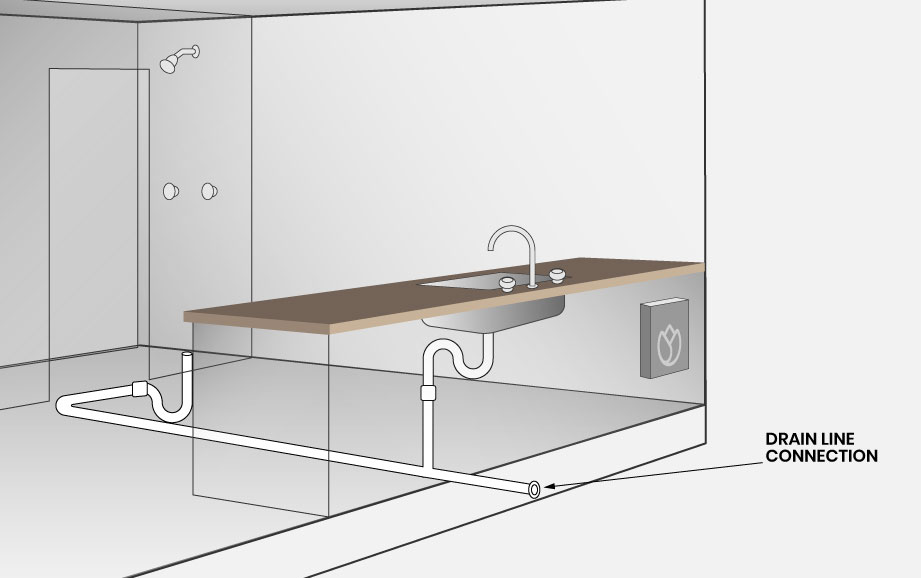
Drain lines come down in two places: one under my shower, the other from my kitchen sink. Both of these drop through the floor, through my trailer and hang just below the bottom of my trailer. They are connected into one drain line, so I have one central point where the water comes out the side. It can then be connected to a septic or RV sewer line connection.
PEX Plumbing Makes Tiny House Plumbing Easy
For many years we used copper and PVC lines for plumbing which were complicated to connect and would split at the slightest sign of freezing. Today, modern plumbing has brought in the use of PEX, and for us tiny house folks, this is a godsend.
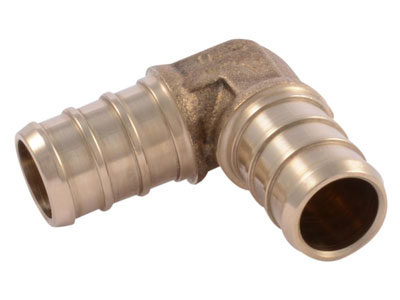 PEX is the name for Cross-Linked Polyethylene water lines. This stuff is awesome: pretty inexpensive, super easy to work with, can withstand freezing temperatures, and is perfect for the DIYer. It’s risen in popularity over the past few decades and is now the staple of any new plumbing system.
The great part about PEX is that it’s super easy to connect with quick-connect fittings. These fittings allow you to cut your PEX tubing, clean up the ends, push it into the fitting, and lock it into place with a water-tight connection. Gone are the days of sweating a copper pipe to add flux, and you can forget about gluing up PVC.
Quick connectors or “push fittings” are often referred to as “SharkBite” (a brand name of a popular quick connector), and they are amazing. You literally just take the pipe and push it in and small metal teeth grip the pipe to create a water tight seal.

What’s even better is that if you make a mistake, you just use a little magnet to quickly disconnect the fitting with ease. Most quick connectors will also allow you to connect PEX lines to other types of lines: copper, PVC, etc.
The PEX line itself comes in several sizes, colors, and lengths. Typically, new homes are plumbed with ¾-inch PEX, but my house was ½-inch line. PEX tubing can be bought just about anywhere. At the time of writing this post, I can buy two rolls of 50-foot PEX (one blue and one red) for around $60 online or about $70 at your local big box hardware store. That will be more than enough to do your tiny house.
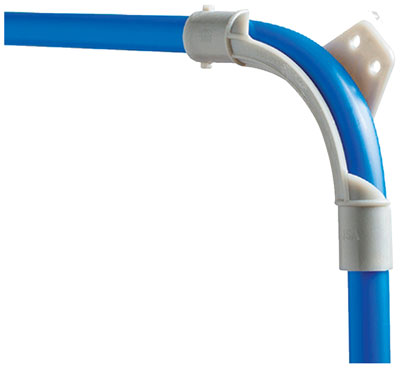 As I mentioned before, you can purchase colored lines to help you color code your water lines as you route them through your house — usually blue for the cold supply lines and red for the hot supply lines.
There is no difference between the colors; people just use them to make it easy to identify different lines.
The last thing you should know about PEX is that, unlike other water line options, you can actually bend it around corners. There are limits to this of course, as you don’t want to kink the PEX line. For ¾-inch PEX, the minimum bend radius is 7 inches. That doesn’t usually mean much to people, which is why they actually sell PEX bend supports to make sure you get it right.
| Tubing Size | Minimum Bend Radius | Minimum Bend Diameter |
| 3/8″ | 4″ | 8″ |
| 1/2″ | 5″ | 10″ |
| 5/8″ | 6″ | 12″ |
| 3/4″ | 7″ | 14″ |
| 1″ | 9″ | 18″ |
*Minimum recommended bending radius is 8 times the outside diameter of PEX (8 x OD). For 1/2″ PEX with OD of 5/8″, minimum bending radius is 8 x 5/8″ = 5″. Over-bending the PEX pipe, deforms its round shape, restricts flow and over-stresses the pipe. Note: minimum bending diameter only refers to the 90-degree and 180-degree (U shaped) bends. Parallel runs of pipe can be spaced as close as necessary.
As a side note, if you do kink the PEX line, it’s often recommended to discard it and use a new section.
Tiny House Water Hookups
There are two main ways to hook up water to your tiny house. One is for longer term, and the other is for short term connections if you want to stay mobile. Either method will face one main challenge: freezing as it goes from the water source to your tiny house. Whatever method you use, make sure to insulate it well.
RV Water Inlet
The first method is using a spigot as your water source. Make sure you use a drinking-water-safe hose, as a regular hose will leach a lot of nasty chemicals into your drinking water. From the hose, you’re going to want to use an RV water inlet to allow the water to enter your tiny house.
Off the back of this inlet, you can tie in your PEX tubing and run it wherever you need to go.
PROS
- Simple to hook up
- Works at most campgrounds
- Quick to connect and disconnect
- Good on mobile tiny houses
CONS
- More prone to freezing
- Slightly more expensive
- Leaky hose connections common
- Can snag hose and damage inlet
Direct Connection
This is a more permanent method for tiny houses that aren’t as mobile or not mobile at all. I initially started with the above method on my house, but found the hose froze pretty often, even in my moderate climate. Recently, I switched over to having a buried PEX line that came right below my hitch, then brought it up to my house. I added insulation to the PEX line, insulating the small span between the ground and the house.
I also should note that I actually extended my insulation a foot beneath the ground for good measure.
PROS
- Less prone to freezing
- Looks neater on outside
- Cheapest method
- Lasts long term
CONS
- Not meant to be moved
- Needs to be cut if you do move
- Requires you to bury water line
- More technical skill required

Tiny House Water Tanks
Many people want to be able to live in their tiny house while traveling around or live off the grid in their tiny house. A water tank is a great way to make your tiny house more livable when you don’t have a direct connection.
The average American uses around 100 gallons of water per day, so if you’re going to use a water tank as your primary water source, you’re going to have to adjust your relationship with water in a big way. After living in my tiny house for years, I’ve averaged out to around 11 gallons per day.
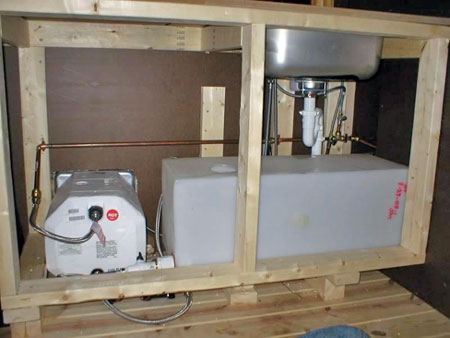 You’ll need water to cook with, take a shower, wash your dishes, drink, and general cleaning tasks. It can add up quickly when you remember that water is 8 lbs. a gallon. I like the option of having a tank, but realistically, you’re going to need a reliable water source from a well or city connection.
The biggest tank I’ve seen in a tiny house was around 80 gallons, which accounts for 640 extra pounds of weight on your trailer. What is more, you can’t just have your tank on one side of your trailer, or your weight will be distributed unevenly side to side.
You also want your tank to be located directly over your axles, if at all possible. This is because too much weight on the tongue or in the rear (lifting up at the tongue) can be very dangerous.
Properly balancing the load on your trailer is critical, and that can be difficult when a water tank is involved.
Water tanks can also slosh, throwing around the weight. Your load and calculations need to take into account that your water tank will get lighter as you use water, too.
You have two options to pump water from a storage tank to your sink.
12 Volt Sink Pump From Water Tank
This is the more advanced option, where you’ll have a 12-volt pump that draws water out from your tiny house water tank and up to your sink faucet. This option usually is only good for cold water, because you’d have to draw so much water through your lines and hot water heater that you’d waste a lot of water waiting for hot water to come through.

- 5-Gallon Fresh Water Tank
- Spout Faucet
- Sink
- Strainer Drain
- Drain Tap With Hose
- Water Pump
- Food Safe Tubing
- Accumulator
Simple Foot Pump Sink From Water Tank
For those who don’t want to get into complicated 12-volt pumps, a foot pump can be a really great option. This is a dead simple system that only requires a few connections and a few parts.

- 5-Gallon Fresh Water Tank
- Spout Faucet
- Sink
- Strainer Drain
- Drain Tap With Hose
- Water Pump
- Food Safe Tubing
- Hose Clamps
Toilet Options For Tiny House Plumbing
No tiny house bathroom plumbing guide would be complete without talking about toilets. For most tiny homeowners, the decision usually comes down to either a traditional flush or composting toilet, but most people realize just how many different types of toilets there are.
Flush Toilet
Flush toilets are probably the first thing that comes to mind when you think of a toilet. Every time you flush, waste empties into a municipal sewer or septic system. They don’t typically need electricity but do use a ton of water compared to the other toilet types.
Composting Toilet
Instead of flushing waste away, composting toilets store liquid and solid waste in two separate chambers. You’ll need to empty the urine jug every couple of days, while the solid waste usually sits for a few weeks before being moved to a second location for further decomposition.
Composting toilets are a staple in off grid tiny house plumbing because they don’t need water, electricity, or sewer hookups.
Simple Bucket Systems
The simplest – and by far cheapest – option is to simply mount a toilet seat onto a bucket. Waste is covered with a dry, absorbent material and dumped as needed. Bucket systems don’t require any electricity or water, but waste disposal is very much hands on. You’ll also need to follow local rules regarding storage, treatment, and disposal, which can be a major headache.
Sealing Toilets
When you use a sealing toilet, waste drops directly into an enclosed bag or liner. The bags then go to a holding tank that you empty when full. Sealing toilets don’t require any water, but they do use electricity.
Depending on where you live, you can either throw the sealed bags in with household trash, or you’ll have to drop them off at an approved facility. You’ll also need to keep a steady supply of liners or bags on hand, which, at an average of $1 to $2 a day, is a pretty substantial ongoing cost.
RV/Cassette Toilets
RV/cassette toilets use a small amount of water to flush waste into a holding tank, which can then be emptied at appropriate disposal sites. Their compact size, cheap price tag, and low water usage make them a popular choice.
Incinerating Toilets
Instead of flushing or storing waste, incinerating toilets use electricity to burn it down into a small amount of ash. They don’t require water or a conventional sewage connection, but with an average price of $4k, incinerating toilets are one of the more expensive options.
Are Flush Toilets Worth The Convenience?
Going the route of a traditional flush toilet will add a good bit of work and cost on your part. Not because they are overly difficult or expensive, but because you’ll need a sewer connection, septic system, or holding tank. Flush toilets require three things: a water supply, a drain connection, and somewhere for the wastewater to go.
The “tap fee” to tie into the city sewer line and the water line is very expensive. My city charges a whopping $11.6k just to connect to the lines at the street. After that, you’re still responsible for connecting that line from the street to your house, which will run you about $10 per foot for the water line and $15 per foot for the sewer line.
Alternatively, you may be able to install a septic system, for $5k to $12k. I was trying to keep my tiny house plumbing costs as low as possible, so I opted for a composting toilet instead.
Tiny Home Sewage
Tiny houses handle sewage in one of four ways: a municipal sewer connection, a septic system, an RV-style holding tank, or a waterless toilet that skips sewage altogether. As I mentioned earlier, connecting to your local municipal sewer service is one of the most straightforward options. But if that’s unavailable, you can opt for an RV-style waste tank or septic system instead.
With a septic system, sewage travels from your tiny house to an underground tank. Once there, solid waste sinks to the bottom of the tank; lighter materials and water move to the top, and bacteria break down the organic matter.
As new wastewater enters the tank, the partially bacteria-treated water is forced out of the tank and into the surrounding soil, where it is naturally filtered and cleaned before returning to the groundwater. Because soil plays such a big role in treating the waste, soil quality matters and not every property is suitable for a septic system.
You’ll need to get a perc test to ensure your land can effectively absorb wastewater, but don’t worry if your soil fails. There are a number of alternative sewage systems that are well suited for land that doesn’t perc.

Tiny House Gray Water Systems
Gray water, or the lightly used wastewater that comes from sinks, showers, and washing machines, is an often overlooked part of tiny home plumbing. Unlike black water, which contains human waste, gray water can be collected and reused for things like landscape irrigation and toilet flushing – which means you can get more mileage out of the water you already paid for.
Setting up a gray water system usually means redirecting wastewater from your sink, shower, and washing machine to a surge tank or filter bag. From there, it’s just a matter of getting the water where you want it. In my case, that was straight into a garden bed.
One thing I’d like to note is that gray water shouldn’t be stored for more than 24 hours, or it may lead to bacterial growth and foul odors. Reusing gray water also isn’t permitted everywhere, so it’s important to check with local regulations.
How Much Does It Cost To Put Plumbing In A Tiny House?
Plumbing your tiny house doesn’t cost a whole lot unless you hire a plumber. Luckily, PEX makes this very approachable, and your drain lines, which will be PVC, are going to be very short runs. If you’re able to avoid hiring a plumber, then you can save big. If you do end up hiring a plumber, expect to pay anywhere between $100-$200 an hour for their work, plus materials.
Here is an example of tiny house plumbing costs from my build:
- 25-foot roll of RED PEX: $15
- 25-foot roll of BLUE PEX: $15
- Five right-angle elbow push fittings: $60
- One Tee-style push fitting: $15
- Name brand shower faucet: $120
- Name brand kitchen faucet: $140
- 20 feet schedule 40 PVC drain line: $15
- PVC assorted fittings: $10
- Sink P trap: $10
- Shower P trap: $15
- PVC pipe cement: $12
- PEX pipe cutter: $13
- PEX deburring tool: $15
- SharkBite removal tool: $3
- One bag nail clamp (50 pieces): $15
Total Cost To Plumb My Tiny House: $473
Other Tiny House Plumbing Costs
I also wanted to share a few things that you might want to factor into your own plans and budget that aren’t included in the above list.
The biggest one, of course, is any labor costs if you hire a plumber. A plumber will cost anywhere from $100-$200 an hour. You can expect about five to ten hours of work for your entire house including your hot water heater, sinks, showers, drain lines, etc.
 Another tiny house plumbing cost I didn’t include here was a water heater. After trying a few different water heaters, I settled on the Rinnai v53e tankless hot water heater. Now, 7 years later, I still love it. Having endless hot water when I need it means I can take long hot showers without worrying or running out of hot water and not having to account for a lot of extra weight in water storage.
Since I only heat water as I use it, I use propane for this, which is a great option for me because I live off the grid and have an off-grid bathroom. While I don’t love relying on a fossil fuel (propane), it’s the most practical way for me to heat water off the grid.
The last thing you might want to consider is if you are going to have a bathroom sink, tub, dishwasher, or laundry machine. These will all add material costs and labor, so just be sure to account for them in your budget, plans and in calculations for weight!
Tiny House Plumbing Tips
From someone who did a lot of things wrong and a few things right, here are some of my best tiny house plumbing tips for when you build your own tiny house.
Put The Kitchen Near The Bathroom
The biggest tiny home plumbing tip I’d give is to have your shower and kitchen sink be as close to each other as possible. If you have the shower on one side of an interior wall and the sink on the other side of that same wall, you’ll save a lot of extra work.
Plan Your System
I’ve said it before and I’ll say it again: a couple of hours of planning ahead will save you a ton of time, money, and headaches later down the line.
Consider Venting
Venting your plumbing system is a big deal, without it your drain lines won’t drain properly. I used an in-line “air admittance valve” which allows air to enter the water line without a full drain going through the roof. These valves are contentious because they can fail, but they worked for my purposes.
Plan Your Drains Carefully
Here is your opportunity to learn from my mistakes. I didn’t take the time to plan my drains carefully and, when I went to install my shower drain line, I discovered a metal beam from my trailer right below where the drain needed to be.
Plan Exhaust Venting
Make sure you have the proper space to vent your exhaust vents for your hot water heater, stove and shower fans. I had a lot of trouble with these because the vent tubes were so big. That led me to getting an exterior mounted hot water heater, which is designed to be outside and vent directly from the unit to the outside.
Slope Drain Lines Properly
Drain lines need to be sloped in a very specific way — ¼ of an inch per foot. Too shallow of a slope and you’ll have clogs, but too steep and your solids will not drain. Getting this right is very important.
Level Your Tiny House
If your tiny house isn’t perfectly level, all your drain lines will not be sloped right, leading to clogs. You want to make sure your sinks drain properly, and that water won’t pool in them. A properly installed drain line will not work if the whole house is off kilter.
Think About Freezing Lines
You want to take frost prevention seriously. Wherever possible, keep your water lines on the inside of your heated envelope, running the lines within interior walls vs. exterior walls. For the connection from your water source to your tiny house, insulate and use heater tape when possible.
Have A Whole House Shut Off
The best addition to my system was a $5 ball valve to help me turn off my water to the house when I go out of town, need to service my plumbing system, or if a leak were to ever happen.
Always Have Access
Make sure you always have a way to access the water lines in your tiny house. It doesn’t have to be the most convenient access, but if you can always get to your water lines, you can fix any problems that arise.
Carefully Cut And Deburr PEX
Push fittings are great, but you need to make sure your cuts are perfectly straight so that when you push the tubing into the fitting, it seals well. Use a deburr tool to make sure the cut is perfectly clean.
Don’t Reuse Fittings Or Tubing
If you have to disassemble a fitting for some reason, best practice is to replace the tubing and fitting all together. Many manufacturers will say their fitting can be reused a few times, and some folks don’t mind reusing the fittings, but in my mind, buying a new fitting for $5 is good peace of mind.
If you kink your PEX tubing, you should cut a new piece and replace it. Here again, for a few cents a foot, the cost of knowing you won’t have an issue later down the line is well worth it.
Tankless Hot Water Heaters Are Your Friend
If you’ve never heard of or had one, tankless hot water heaters are amazing. I ended up with a Rinnai hot water heater and I love it! Tankless hot water heaters essentially take cold water and run it over a heated coil exchanger to heat the water as it passes through the unit.
This is great because you’re not heating water when you’re not using it, which is perfect for off grid tiny house plumbing. You won’t ever run out of hot water, and since it isn’t a tank, you don’t have the bulk or weight of a tank.
Remember That Water Is Very Heavy
If you’re building on a trailer, you need to make sure you take into account the water that’s in your water lines, in your hot water heaters (if you have a tank hot water heater) and in a tiny house water tank.
Water is very heavy, weighing in at around 8 lbs. per gallon. If you have a water tank in your tiny house that holds 50 gallons of water, that’s over 400 lbs.! And if your hot water heater has a tank of 40 gallons, that’s 320 lbs. So, if you have either of these, you need to work it into your weight calculations for your trailer.
Consider RV Parts
RVs have a few features around connecting to utilities when at a campground which are very helpful to tiny house folks. Fresh water inlets, access doors, sprayers, RV plugs, etc., all are useful when connecting tiny houses to the grid.

Tiny Home Plumbing: Learning How To Go With The Flow
There’s a lot to think about when figuring out how to plumb a tiny house, but don’t let the number of pipes, vents, connections, and fixtures intimidate you. Just take things one step at a time and follow the tips I’ve given you, and everything should fall into place.
And keep in mind that installing your own tiny house plumbing system doesn’t mean you have to do everything yourself. If you find yourself struggling, call in an expert. Even doing some of the work yourself will save you some money and give you hands on experience that will come in handy if you ever have to make a repair.
Your Turn!
- Which tiny house water system do you plan on using?
- Are you planning on having on or off grid tiny house plumbing?
I went to a Tiny House build workshop, so I’m down with the PEX system — it’s awesome. But tell me where I can buy a “Drink-safe” hose. Neither Lowes nor Home Depot carries them last time I checked.
I’ve seen them in walmart with the RV items, lowes, and on Amazon. Any RV / camper store would have them too
Both Lowes and Home Depot carry the drinking water hoses in my area, you may need to have them order it. Search for Marine & RV water hoses, it will show up then.
RV stores have potable water hoses
Did you put a trap under your shower. If so what brand did you use?
There’s no discussion of hooking up a conventional toilet; there seems to be an assumption that the builder will use a composting toilet, which isn’t a given. I’m not sure at my age that I want to deal with the maintenance involved with a composting toilet.
I’m in my 60s and have lived with a composting toilet for 5 years BUT it isn’t the type that is one self contained unit. I have an Envirolet unit that has the composter in the basement. So if you are thinking of having a stationary house, I suggest a basement for storage and utilities. And if you can’t hook up to sewer and don’t want to put in an expensive septic system, this is a good alternative. I clean it out ONCE A YEAR and take out less than a 5 gallon pail of ‘compost’. Still not for the faint of heart (or nose) and if you have more than two people in the house it can be touchy.
Hi there! Very nice blog. Thank you for sharing information regarding tiny house plumbing work. You have shared information on tiny house tanks, diagrams, and costs which is very good. By using a tiny house plumbing option you can connect one to more pipe in an easy way for flow. Keep sharing, keep posting such amazing blogs.
Do you have any insight on disposing of grey water off grid? I was hoping to be able to use something resembling a French drain with my stationary tiny house. (I realise there are considerations based on municipal laws, as not all options are allowed in all areas)
On your disclaimer under the drain line diagram you suggested to hire Electrician rather a professional plumber. Im guessing its a typo mistake. Overall well done explaining. Easy to understand. Keep coming back.🙏
Thank you so much for such wonderful, helpful and clear information! Truly appreciate! 😇🫶I wanted to know about Dding an outside faucet for a garden hose 🤣😁
Great post! this guide offers useful advice for anyone building their own tiny residences and highlights the significance of dealing with water systems with care due to their weight. It’s an excellent resource for anyone interested in the practicalities of tiny house life. If you need professional plumbers, you can easily locate home plumbers near you by clicking on this link: https://proplumberservice.com/mobile-home-plumbers-near-me/
In your article you do not mention hammer arrestors, as I am about to run water lines to my permant foundation tiny home with kitchen sink,vanity, toilet walkin shower with rheem13k REX Instant electric water heater, I am wondering if hammer arrestors are needed near water heater I am using system similar to one you describe my longest run to my kitchen about 9ft.
Do you have hammer arrestors or if not do you have any problems
Concerned about P trap in my tiny house freezing. Can we put it in the interior or are there other options.
If I’m planning for the long term connection rather than the RV connection, how do I end the line? I’m not building where I’ll be living. Do I leave a length of pex sticking out of the house at the inlet?
You do not mention drains here at all. What to do with the gray water from the sink and shower? Thanks
This was an excellent article for tiny house plumbing.. I can’t find a decent book or how to video. If I have questions would you respond and how do I get in touch with you?