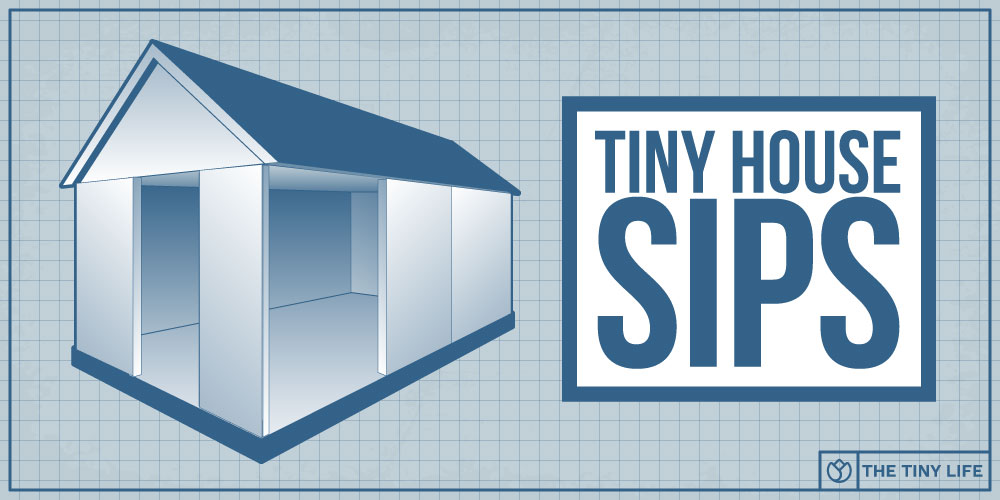
Lately, I’ve been hearing more and more about tiny houses built using structural insulated panels (SIPs). In fact, I’d say tiny houses built with SIP panels have become a bit of a cult hit in the tiny house world.
SIPs are nothing new, and they have yet to make any major strides. While I’ve seen a few houses built with them and even participated in building one myself, the building process hasn’t been fully refined. That said, I wanted to share what I know and some intriguing research on using these highly insulated materials to make a SIP tiny house.
Here’s what you should know if you’re considering building a tiny house using SIPs.
NAVIGATION
What Are SIPs?

I must admit that researching SIPs left me craving an ice cream sandwich. Why? Because that’s exactly what these structural insulated panels look like. The “cookie” layer is comprised of OSB (oriented strand board) and the inner “ice cream” layer is made of expanded polystyrene foam. These layers are bonded together to create rigid four to 12-inch thick prefabricated panels that make excellent building materials for tiny homes.
Now, not all SIPs are made from OSB and polystyrene. Some use other insulators like polyurethane. Others may use outer layers of plywood, fiber cement, gypsum, or even metal. SIP panels are highly engineered products that are almost always created in a factory setting using machines to apply glue and pressure to bond the SIP together and cure just right.
Prefab SIPs come in various sizes, but most are between 4×8 feet and 8×24 feet. They can be challenging to modify after they leave the factory, so designers and builders usually work within the parameters of the standard sizes — like constructing with blocks.
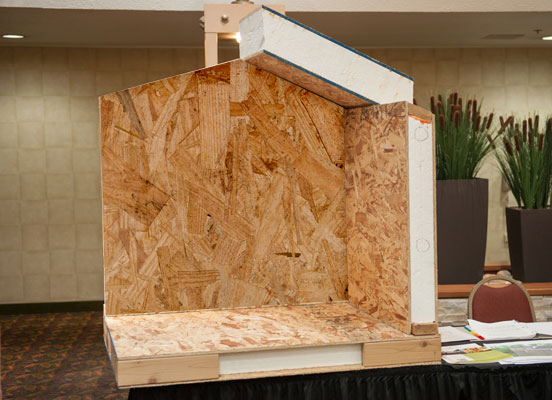

Building a tiny house using SIPs, on the other hand, means you’ve got a super-efficient, airtight construction. The polystyrene foam is closed cell, making it an excellent insulator that is both high in R Value and rigid in strength.
As tiny house wall panels, they provide plenty of protection. The R-values are around 7 per inch, and with SIP panels that are 4 inches thick, that’s an R-rating of 28 — more than double the rating of a traditional wall with studs. You can go even thicker with SIPs as well, should you desire, just keep in mind that your window sills will be deeper and your interior space will be smaller because of it. Either way, they’re very energy efficient.
Another benefit is that because prefab SIP panels are bonded in a factory, there are no air gaps. You don’t have to worry about insulation slumping over time because it’s one solid, rigid piece. The polystyrene acts as a vapor barrier and an air barrier as well as a thermal layer.
The Pros And Cons Of Building A Tiny House Using SIPs

SIP Tiny House Pros
- High insulation rating
- Simple to use
- Cuts down on construction time
- Quality controlled by manufacturer
SIP Tiny House Cons
- Requires a high level of planning
- Difficult to adapt and change
- Requires significant lead time
- May bother people with chemical sensitivities
Aside from the incredible efficiency and insulation properties of these tiny house wall panels, SIPs have many other pros as well. Let’s expand a little on the pros and cons of SIPs mentioned above.
Pro: SIPs Have A High Insulation Rating

First, as I mentioned before, SIPs have an excellent insulation rating. They’re often used by tiny house builders who are looking for something more efficient that traditional framing. Wooden SIPs are very strong. Metal SIPs have drawbacks and can be challenging to work with, but they are used in light commercial construction and home construction in places like Florida because of hurricane resistance.
Pro: SIPs Are Simple To Use

SIPs can simplify your build. But one thing to keep in mind is that you will have to use an AutoCAD computer program when designing your home. Many homeowners build from a sketch or rough plans, but when working with SIPs, you need a technical 3D rendering to have it thoroughly planned out beforehand as the SIPs are built and cut to fit the plan. Once your house is planned out technically, though, the construction process is simple and requires little more than an Allen key wrench and a second pair of hands.
Pro: A SIP Tiny House Requires Less Construction Time

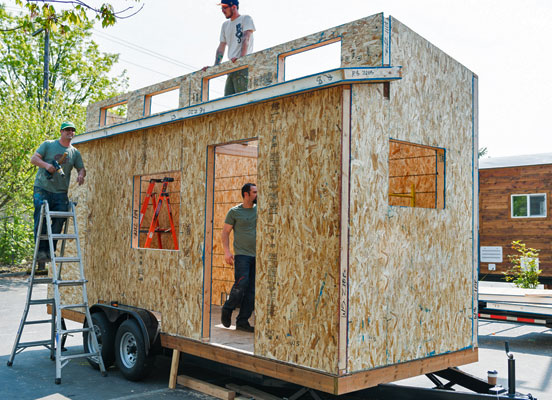
You can construct a SIP tiny home in about six hours with the help of two to three people. That means you’ll have walls up, a roof on, and a floor laid in a day. If you’re paying for a builder to construct your tiny home using SIP panels, you’re going to save money on build time and labor. Yes, the up-front cost is slightly higher, but you’ll break even when you figure in the savings on construction time.
Pro: SIPs Are Quality Controlled

Because SIPs are manufactured in a controlled factory setting, they’re uniform, quality controlled, and ready to go when you buy. In addition, most SIP manufacturers are highly familiar with the product and materials. They oversee every step — from construction to gluing and drying — so when you purchase SIPs, you can feel comfortable that you’re getting a good product.
Con: Lots of Planning Is Required For Building A SIP Tiny House

As mentioned above, when you build a tiny house using SIPs, you will likely need to work with a professional designer or architect. Everything must be 3D rendered and carefully planned before you build. The panels are pre-cut for electrical and other utilities. Yes, you can modify them slightly as you go, but the material isn’t easy to change because the walls are solid, dense, and hard to cut.
Con: Tiny House Wall Panels Are Difficult To Adapt Or Change

When you start building your tiny house using SIPs, you WILL find something that you need to change — it’s practically inevitable. But even changing wire placement in your tiny house wall panels can be an ordeal. To run a wire, you’d take a large ball bearing, heat it with a blow torch, drop it into the foam and let it burn through to fish your wire through the wall. As you can imagine, this is a tricky and difficult process (not to mention a bit dangerous). Utility re-routing is nearly impossible, so plan upfront very carefully.
Con: Getting SIPs Can Mean Long Lead Times

Because SIPs require so much lead time and planning, they can take several months to arrive. First, you need to work with a designer or architect to map out your plans. Then, you’ll send your plans to a SIP manufacturer for production and wait for them to create the SIPs. You’ll also need to figure in shipping time if you don’t plan to pick up the SIPs yourself. If you’re in a rush to get into your tiny house, SIPs may not be the way to go.
Con: Chemicals Are Used In SIP Construction

A tiny house made from SIPs may not be an ideal option for someone sensitive to chemicals. OSB board, polystyrene, and the glue for bonding the panels can all let off some low-level chemicals during the initial curing process, but are largely inert after the first 48 hours. So while most of us wouldn’t need to worry about off-gassing as an issue after a few weeks, those with chemical sensitivities and allergies may want to reconsider working with SIPs.
How Much Does It Cost To Build A Tiny House Using SIPs?

Of course, one of the biggest questions any tiny house builder has to ask is how much will it cost? How much is it to build a tiny house using SIPs versus traditional construction?
The short answer is that it costs about $5,000 for the SIPs to build a tiny home. That’s just for the materials themselves and doesn’t include the plan engineering, design, or architecture. That price also doesn’t include paying builders to construct your home. But honestly, once you get the SIPs, you can usually build it yourself with the help of a friend. The construction is quite simple.
The price of the panels doesn’t include the costs for setting up the electric, utilities, or finishing, either. The SIPs only cover your framing, sheathing, vapor barrier, and insulation.
Another cost factor to consider is the transportation of the SIPs. Since the panels are constructed in a factory, you’ll need to get them to your location one way or another, and shipping can really add up.
 Save money on shipping by picking up your SIPs yourself! Take your tiny house trailer to the factory and have them load it up. Driving the SIPs to the construction site on your own will save you a bundle on shipping costs.
So how does building a tiny house with SIPs compare to the cost of building a traditional tiny house?
It’s really quite similar. Insulation for a tiny house costs up to $3,000 in spray foam, depending on the type you use. Lumber and sheathing would be around $1,000, possibly higher depending on the market, and your vapor barrier is about $150 to $250.
While traditional materials may add up to be slightly cheaper (but still comparable), you should also consider the construction costs. With SIPs, you’re building in a day, whereas a traditional tiny house can take a few weeks to build.

Your R-value will also be better for your roof when you build a tiny house using SIPs, thanks to the excellent insulation qualities. You may even be able to get away with a smaller HVAC system. The cost savings could be around $500 to $700, depending on your system.
On the other hand, you will need to consider additional ventilation when you construct with SIPs. Traditional houses “breathe,” letting in air from the outside, heating or cooling it, and circulating it through the home because it’s not perfectly sealed. The airtight aspect of SIP construction needs the assistance of a ventilation system to exchange the air, dehumidify it, and keep it from getting stuffy or even toxic.
All of this can be accomplished with an ERV (energy recovery ventilator). Fortunately, these can be added to your HVAC system without a high cost and will give you the added benefit of control over your air quality. As a result, you can enjoy precisely filtered and safe air in your tiny home.
After all is said and done, building a tiny house with SIPs is nearly the same as a traditional home when it comes to cost. You may enjoy a home that’s more energy efficient and comfortable, however, should you choose to build using SIPs.
How to Build A Tiny House Using SIPs

Now to get into the technical aspects of building a tiny house with SIPs. As I mentioned before, wooden OSB SIPs are pretty easy to work with once you have done some careful planning. For a novice builder, SIPs are fun to use and come together really quickly. The biggest drawback is that you’ll need to be completely sure of all the planning before you even start.
I highly recommend paying someone to design your home using an AutoCAD program. Yes, it’s an investment, but it will pay off in the long run, especially if you plan to construct your SIP tiny house on your own.
How To Make Your Own SIP Panels

Can you make your own SIPs? How do you make your own SIP panels? Is it even possible to DIY SIPs?
The short answer is you could, in theory, build your own SIP panels, but I would strongly recommend against it. Tiny house building codes are already a little challenging to navigate and seem to be an area where tiny home builders have many questions. Building these panels requires several certifications, quality testing, and more. To get the proper certifications, you’ll need to invest serious money upfront.
SIPs require pressure, adhesive, and careful construction. It’s not a matter of simply gluing layers of polystyrene or polyurethane (which can react to certain adhesives) in between panels of wood. Not all insulation bonds well to wood and the process requires careful engineering and precision.
Some DIY SIP builders work with alternatives like galvalume sheets or use a steel hat channel with Expanded polystyrene Styrofoam sheets. Unfortunately, these methods can create several problems ranging from thermal bridging and conduction to being plain difficult to work with.
If you want a long-lasting, sturdy tiny house, invest in pre-constructed SIPs. Making your own just isn’t worth the time, cost, effort, or headache.
How To Install SIP Panels
Jump To Section


Once you have your design finalized and you’ve ordered your tiny house wall panels, you’ll want to follow the SIP manufacturer’s instructions on putting together your tiny house. Each manufacturer will have their own way to assemble a SIP house, but below are some common ways to give you an idea of how it works.
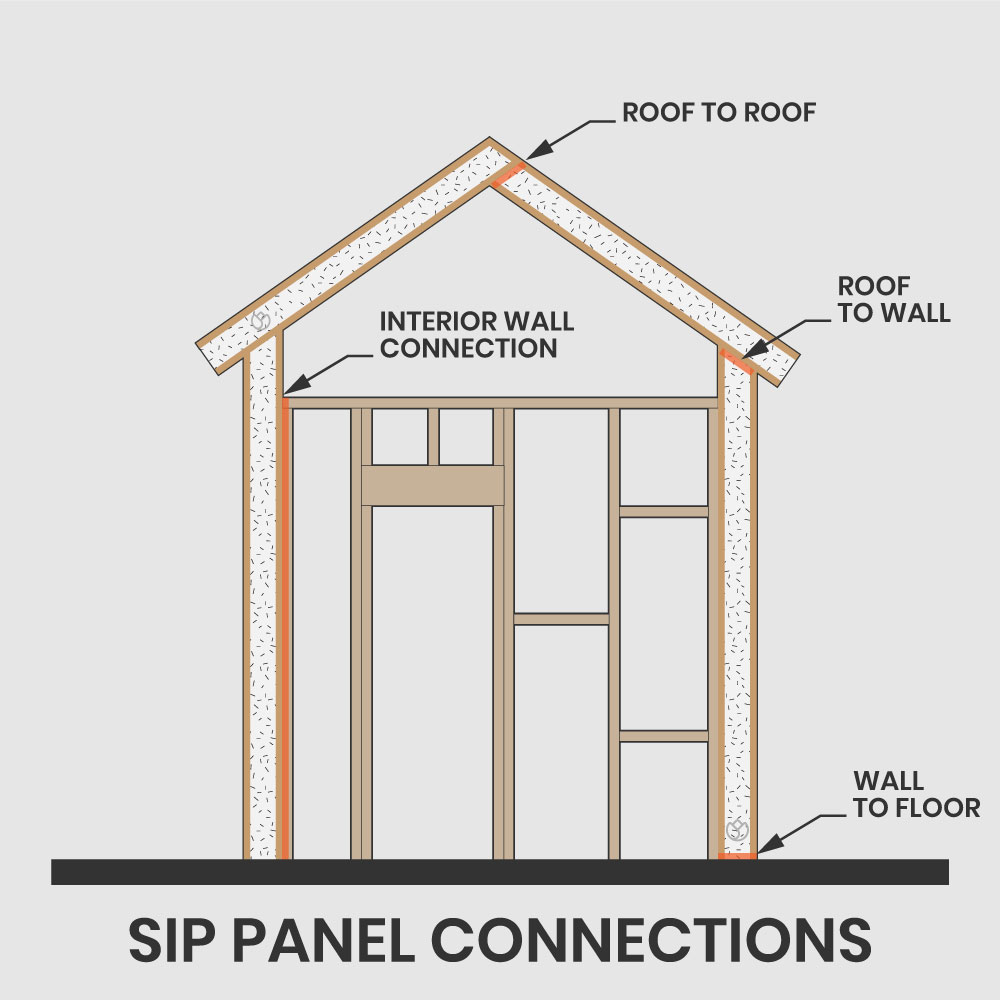
SIP Roof Connections
There are two main places where your roof system will interact with other systems: at the peak where one SIP meets another SIP and where the roof SIPs slope down and meet the top of your walls. These areas are critical to get right for both proper air sealing and water sealing.
These connections are complicated and should be installed per the manufacturer’s directions, but generally this is what you’re going to be looking at.
SIP Roof-To-Wall Connection
Where your roof comes down from the ridge and meets the top of your wall is the most complicated connection of all because of the angles involved. To make this as easy as possible, most manufacturers will design the top of their SIP wall panels to be cut at an angle from the factory, but if not, you’ll have to make that cut yourself.
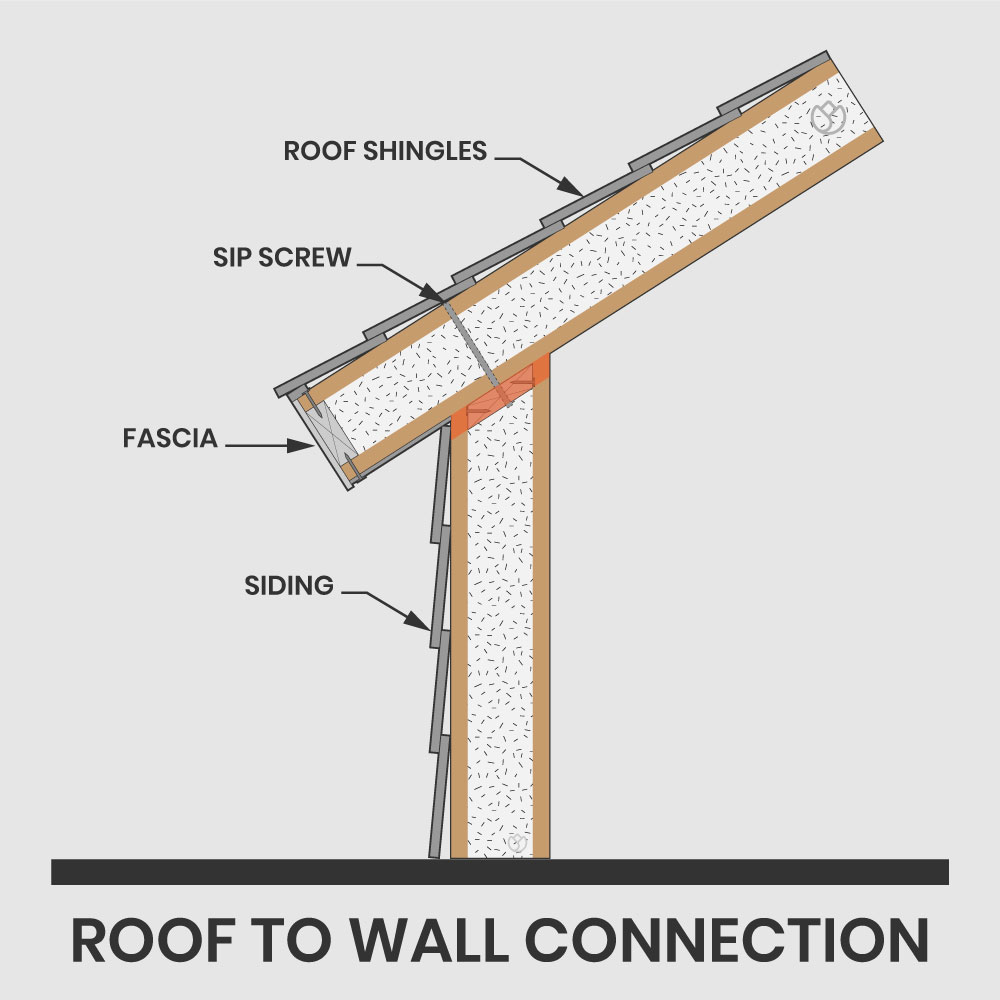 The top of the wall should be angled to match the pitch of your roof. Be sure to trim out the end of the SIP with a piece of lumber inset into the top of the SIP wall. This allows for a more durable edge as you place your roof SIP and also provides a better surface to apply sealant and nail into.
The roof SIP, which usually needs to be put into place by a few people lifting or by a small crane, should be laid into place so that it rests squarely with the top edge of your wall. After laying your roof panels in place, you’ll make your roof-to-roof connection up top, which I’ll get into next. Then you’ll fasten through the roof SIP into the top plate of your wall with a very long screw. You can typically purchase these fasteners through your SIP manufacturer. Two popular options are FastenMaster and Spax.
You’ll trim out the end of the roof SIP (before you lift it up into place) with a nailer board and then finally all your fascia details. This roof system is an unvented roof system, so no need for soffit vents or the like.
SIP Roof-To-Roof Connection
Out of all your connections, the roof-to-roof connection is where most future problems can stem from. Not getting this connection right will be critical to the health of your entire home. This joint will be different between manufacturers, but the below is a common method and will give you a good idea of the process.
 Your roof-to-roof connection for SIPs is almost like taking a wall-to-wall corner connection and tipping it over. You’ll start by installing a ridge beam squared up to the house. Then, before lifting your roof panels into place, you’ll need to figure out how you want to approach the taping of the seam because it needs to be sealed on the inside, between the ridge beam and the SIP.
One option is to lay the tape sticky side up with the peel paper still on it, then once a panel is in place, lift it up slightly and peel the paper off. You might also consider applying half of it to one panel on the ground and then leaving the paper on the other half until you lay in those panels.
One you’ve got both roof panels in place, the exposed end of the upper SIP should be trimmed out with a solid wood piece to reinforce the ridge peak. Use long structural screws to fasten the SIPs to the ridge beam.
I’d also suggest going above and beyond the manufacturer directions when it comes to sealing. Lay a single piece of peel-and-stick roofing membrane along the entire length of your ridge line so that the middle of the membrane sits at the top, with half draping down one side and the other half draping down the other side.
SIP Wall Connections
The type of joint between walls will depend on your SIP manufacturer. Once you’ve put the panels of each wall together, you’ll use caulk or spray foam, per the manufacturer’s instructions, to create a weather-tight seal. Once the panels are sealed together, the entire construction is extremely solid — virtually impenetrable.
Depending on how your panels are manufactured, there are three ways of joining the pieces together — all variations on tongue-and-groove-style construction.
If we go back to the ice cream sandwich analogy, you can think of lining up the different sandwiches side by side to form a wall. To connect each wall piece, manufacturers will likely offer one of three options: foam joints, splines, or inserts.
SIP Wall-To-Wall Connections
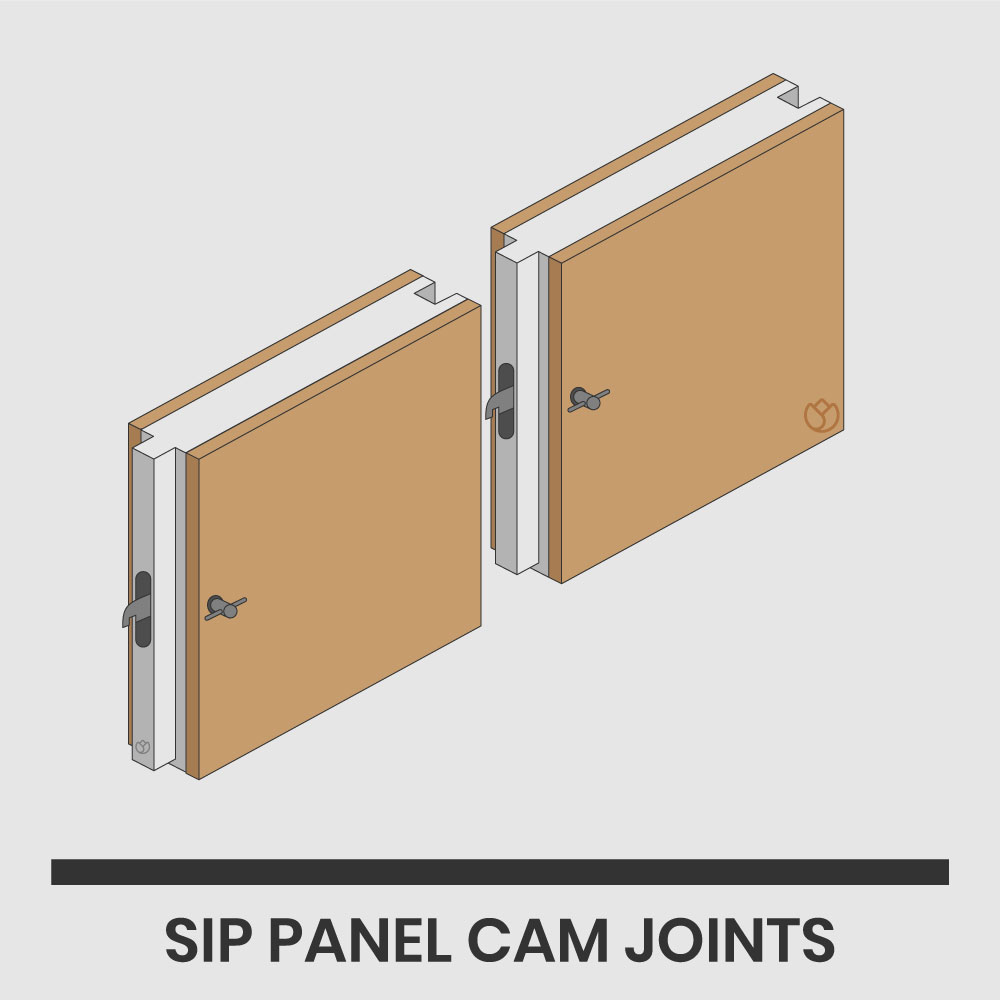
Cam Joints
Cam lock joints are an excellent method of joining sip panels. Each panel has a protrusion on one side that interlocks like a puzzle piece with the next SIP panel.
Instead of nails or screws, the panels are held together with a clever cam locking system that includes a removable locking handle.
This is a popular option for connecting two SIP panels together side by side and requires the use of a wrench to twist the cam within the wall in order to extend a small cam arm which grabs a pin in the wall next to it and pulls it snug.
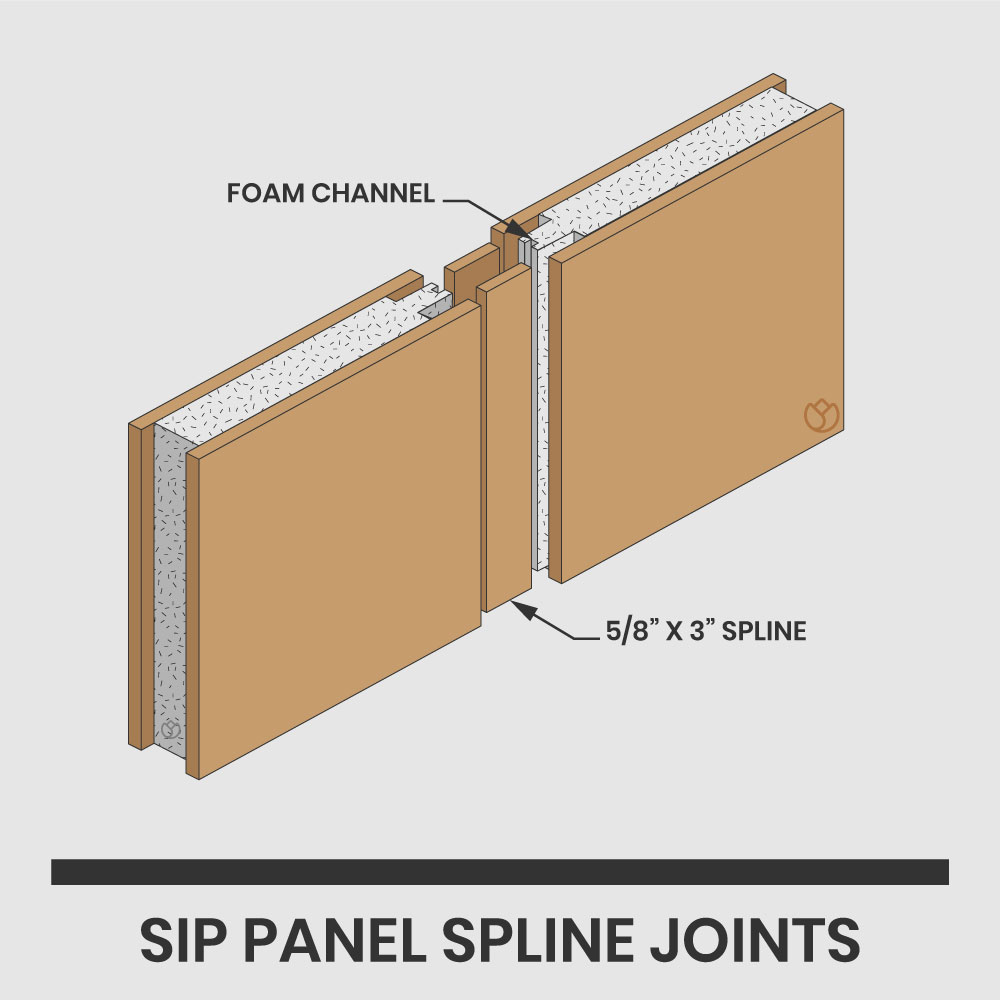
Spline Joints
Splines are usually made of wood. The spline extends beyond the edge of the SIP and then fits into a foam channel on the adjacent SIP. The pieces interlock together to form a tight seal.
This is good because it adds more rigidity to the wall to wall connection, but it does reduce your R value at the joints. While this isn’t a huge issue, because you’ll still have an R value of about 15, it is still less than the rest of the wall. The other downside is I see the potential for these fingers of foam to get beat up in the installation process, leading to issues.
You do want to make sure you properly seal this because moisture in the air here could condense or allow for air to leak in this seam.
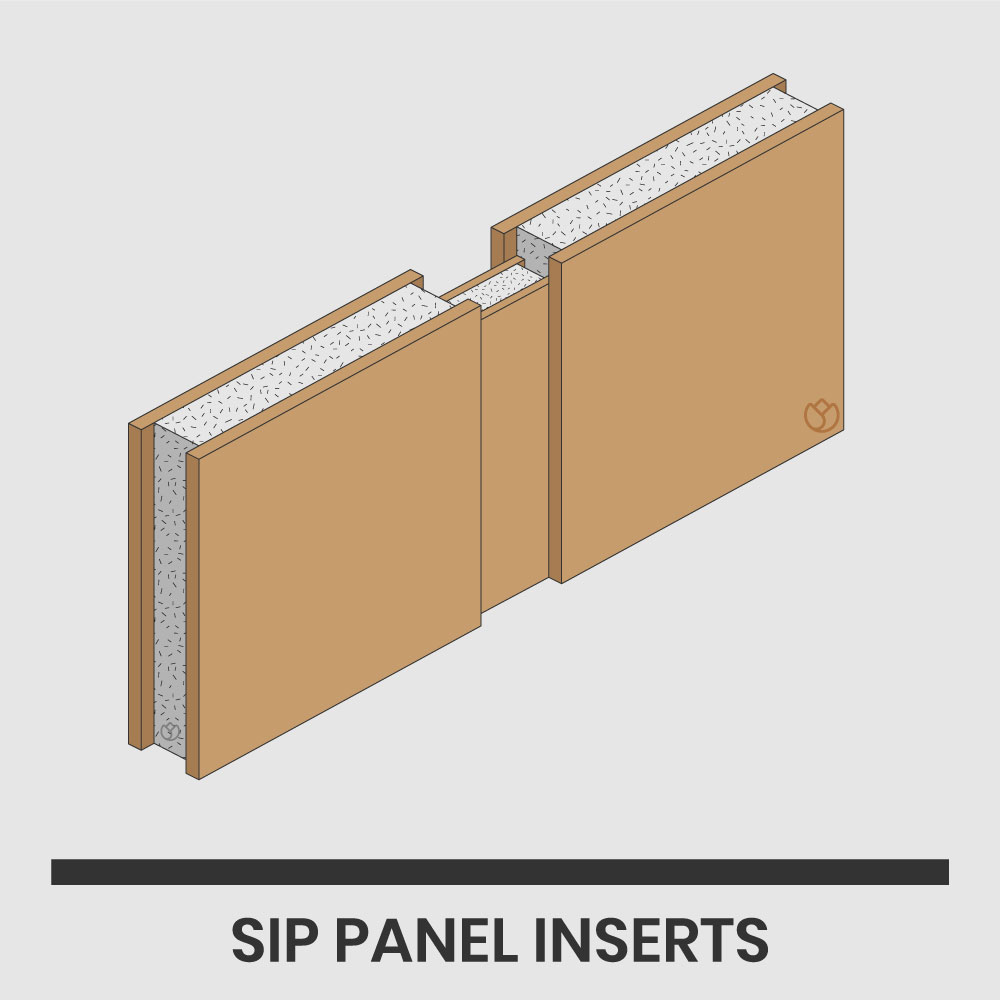
SIP Inserts
The third connection option is using inserts. The insert is constructed of foam and wood and similarly fits into the center notches of two SIPs to connect them. The panels are nailed together or reinforced as needed from the outside.
This is my favorite of the wall to wall connections because it brings good rigidity to the connection, but because the connection is essentially a mini sip, the edges of the foam are more protected. This means on the job site that it will be a bit more durable than the above spline method, avoiding possible issues.
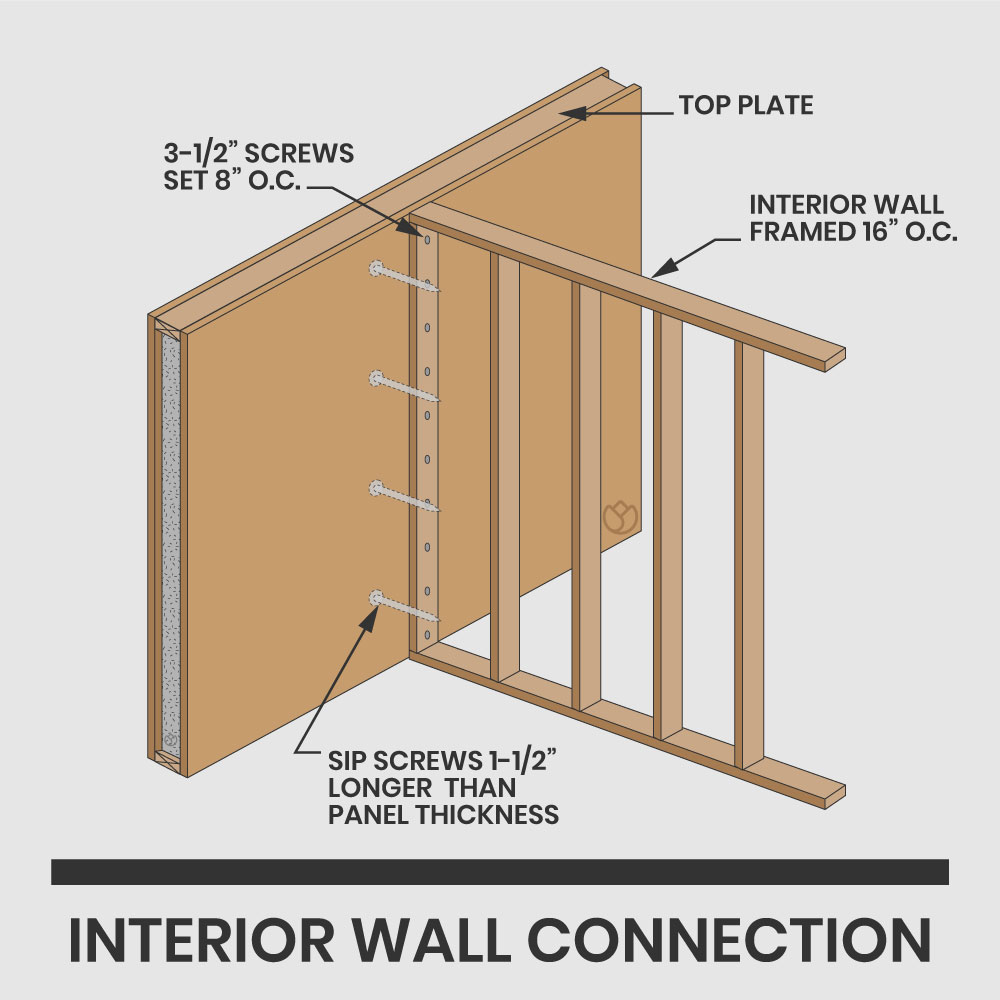
SIP Interior Wall Connections
Because SIPs are structural, most of your interior walls don’t need to be load bearing, which makes it pretty easy to frame out interior walls. Because your envelope is so tight, you don’t have to worry about insulation if you apply the wall frame to the inside of the SIP panel. Then you can leave empty for easy wiring or pluming, or apply sound treatments like Roxul safe n sound in areas you want to deaden sounds.
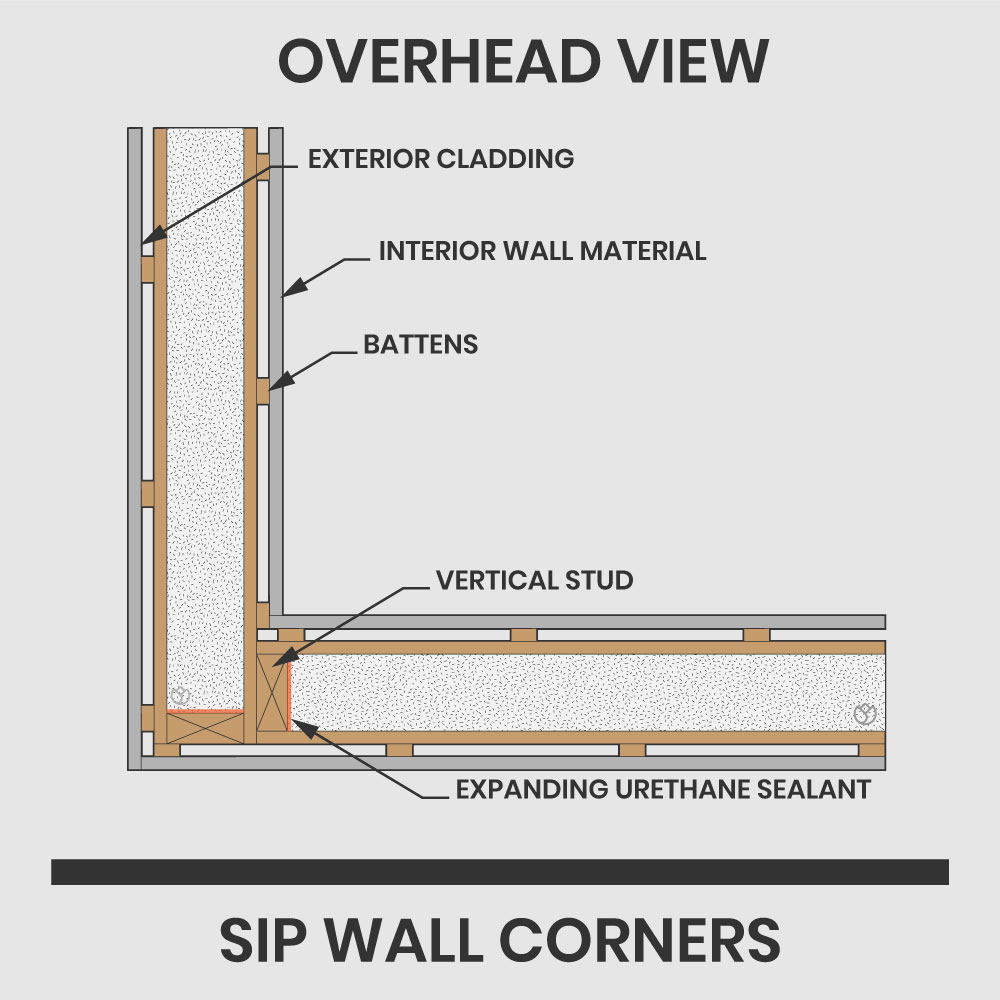
SIP Wall Corner Connections
Finally, fasteners hold it all together. You can typically purchase the fasteners through the SIP manufacturer. Two popular options are FastenMaster and Spax. This approach is similar to a California corner, which minimizes thermal bridging from the inside out. Corners are susceptible to air leakage, though, so using a sealant or gasket here is advisable for sealing.
Sip Wall-to-Sill Plate Connection (SIP To Floor)
SIP sill plate attachment is pretty straight forward. You’ll start by installing what amounts to a double-layer sill plate. The lower sill plate sitting on your subflooring is going to run the entire perimeter of your house. This piece should be a treated board, sealed with a continuous bead of sealant and flush with the outside of your foundation/floor.
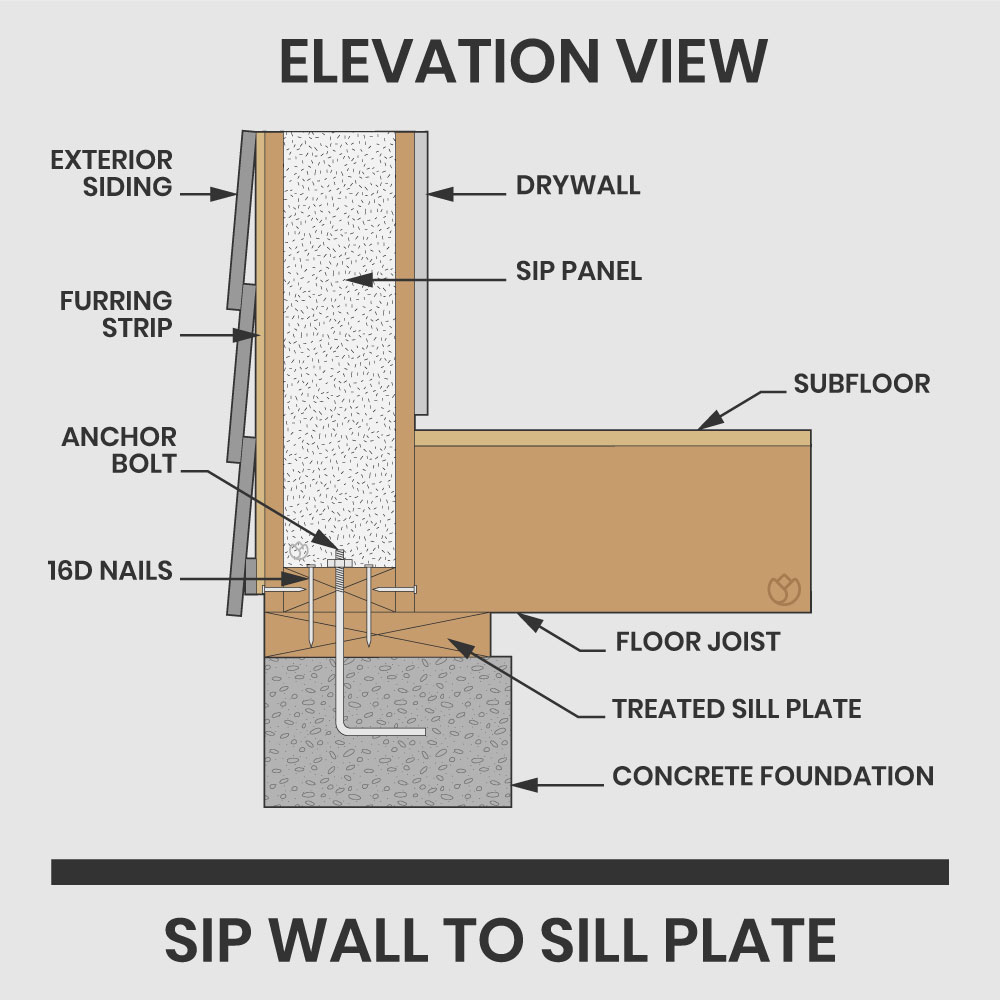 Your upper sill plate will be designed so it can slide within the bottom of the SIP panel. The upper sill plate will be narrower than the lower sill plate to account for the thickness of the OSB on both sides. That means that when you mount it to the bottom sill plate (before it’s attached to the SIP) it should be inset from both edges the same thickness of the SIP’s OSB.
Fasten both plates with 16D nails and then use code-approved anchors at appropriate intervals. Then, when you tip up your wall, the upper sill plate will slide inside the bottom of the SIP. In total, the width of the upper sill plate plus the thickness of both OSB sheets of the SIP will be the thickness of the bottom sill plate. The SIP’s OSB should be sitting on top of the bottom sill plate and be flush with it, inside and out.
Once your SIP wall is up and seated over the top sill plate so that it’s resting on the bottom sill plate, you’ll drive in manufacturer recommended fasteners from the outside and inside through the OSB of the SIP into the top sill plate.
How Long Does A Tiny House Made With SIPs Last?

As we’ve discussed, SIPs are an excellent choice for beginners, but they require some significant planning because they’re hard to alter once the build progresses. If you do decide to build a tiny house using SIPs, you can expect your home to be solid, warm, and safe.
Once you’ve completed building your tiny home out of SIPs, you can expect it to last for 50 years or more — the same length of time as a traditionally built tiny house. Polystyrene is long-lasting and unlikely to break down. When it comes to fire, SIPs are flammable, but no more so than other traditional construction materials. Plus, polystyrene eliminates the chimney effect that can cause fire to creep between walls, so SIPs may be slightly slower to burn. The wooden OSB, however, is still combustible.
Final Thoughts On SIPs

Building your home from SIPs can be a fun (yet somewhat challenging) endeavor. The great thing about building a tiny house using these panels is that, as long as you’ve done plenty of quality planning, the entire construction can be erected more quickly than a traditional build. You can use similar finish materials (roofing, trim, etc.) to complete your SIP tiny house, and you don’t need to worry about insulation, framing, and some of the other challenges that come with traditional construction.
With proper sealing and construction, SIPs are also weather tight, keeping air infiltration out and your home at a consistent temperature. Ventilation is an important consideration, of course, but you can include that in your HVAC plan, especially since SIPs tend to be more energy efficient than traditional construction.
If you find the idea of building a tiny house using SIPs intriguing, I urge you to explore it as an option. It’s undoubtedly a convenient material that has piqued my attention. I would definitely consider using SIPs for tiny house construction in the future.
Your Turn!
-
- Would you use SIPs to build a tiny house?
- Do you know how to use AutoCAD, or would you need to outsource design?
Great information thanks. I’ll stick with studwork with a continuous R10 rigid foam exterior layer, plus R14 between studs. I build sectionally in the workshop, including roof rafter sections, and then assemble finished sections on the trailer bed in a couple of days. A cross between traditional and SIP-style?!
Where can I find construction plans using SIPS?
I definitely want to use SIPs to build my tiny but am struggling to find a company to make them. I have done several internet searches but there are a lot of results to wade through. Any advice on how I can find a reputable SIPs company that has experience with Tiny Houses?
Hey Leslie,
My family’s Tiny is being built right now, we used SIP’s from Insulspan. They are located in SE Michigan. We got the SIP’s that were made with the electrical chases installed to make the electrical wiring easier. I’d recommend checking them out if you haven’t already.
Hi Ryan and all readers,
Thank you for your research and writing this article. Not many writers and fewer publishers contribute to the subject of SIP construction methods that are available. I have been designing and building using SIPs since 1976 – first home for a client was using Metal Walk-in Cooler/Freezer panels in upstate NY – that was prior to calling them “SIPs”. I have used every method of highly energy efficient construction systems and methods including Metal SIPs, OSB SIPs, double wall, Larsen Truss, 2×4 and 2×6 walls with foam insulation on the exterior and a few modifications of these. Overall, I have found that Metal SIPs (both EPS and Polyiso) are the best construction method due to: ease of installation, quickest, less overall cost, smaller HVAC requirements, versatile shell with the ability to make the structure look like anything you want (interior and exterior), contemporary, log, traditional, eclectic, mid-century, modern, etc.
There are a few details that you missed, nothing that you would know unless you have built many SIP structures. I have developed a few details that eliminate some common pathways of air infiltration and exfiltration. Like with most anything details and experience makes a huge difference in the result of anything and everything we do. Engineering/Design for incorporating SIPs in a build is NOT a mystery and the services of an Architect, while very beneficial, are not required. I have found that Architects are great at providing beautiful and interesting designs for structures for their clients. I love them! Most SIP manufacturers have the ability to guide a one-time builder in coordinating their plans with the manufacturers’ details to arrive at a construction plan that eliminates as much waste as possible and is straight forward to construct. Details for installing Plumbing, HVAC and Electric are easily accomplished if you know what the possibilities are (many). I prefer to use USA made products if available and equal but I do use European windows and doors. They are far superior to anything that is made in the USA. There are European tapes which are readily available that I use for specific applications and depending on their particular application are superior to many USA made products. I always use Air-to Air Heat/Energy Recovery/Ventilation in all of my designs and builds. There are small units available that are perfect for Tiny Homes.
I do not want to make this an free advertisement for my services but if you, Ryan, wish to offer a method for me to do advertising on your site I am interested.
Best regards to all, Richard Melius Winston-Salem , NC rich@strongwoodcarolinaloghomes.com
This ecological socket is extremely important when building houses, whether prefabricated or made if IPS of wood. Thank you, Pre-Fabricated EcoMorada
Very informative article. Could you possibly recommend/ refer me to potential contractors, designers, etc., that could help me in the Kansas City, MO area? Please and thank you.
I found this post incredibly informative! The benefits of using SIPs for tiny houses really stood out to me—especially the energy efficiency aspect. I’m considering a tiny house build myself, and these insights have definitely inspired me to explore SIPs further. Thank you for sharing your expertise!