
NAVIGATION
 Roof Options
When I built my own tiny home, my tiny house roof was something I took a lot of time and care to install. A roof defines the character of your house, keeps the rain away, and protects everything under it, so making sure you get this right is crucial.
Your roof seems simple at first, but it has a lot of things that go into it. In this post I’ll get into what types of tiny house roofs you can choose from, what materials to consider, how to insulate your tiny house roof and whether should you vent your roof or not.
But first I want you to understand that a tiny house roof is not a single piece — it’s actually made up of several layers that make up the roof system. Understanding this system is critical to building a roof for your tiny home that will keep your house in good repair for a long time.
What Does A Roof Do For A Tiny Home

Let’s start out with what a roof does, because after teaching so many people how to build one, I’ve seen some common misconceptions. Making sure your roof is done properly relies on you getting the details right.
Your Roof Controls Four Things: Rain, Air, Vapor and Thermal Transfer
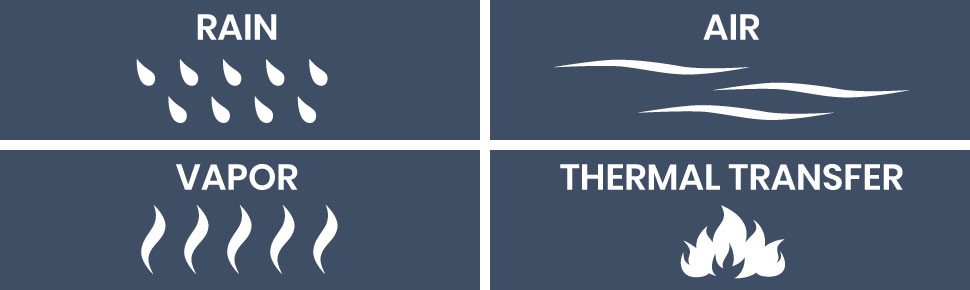
I learned these from when I was building my own tiny house, but years later I was turned onto Joseph Lstiburek’s Perfect Wall concept over at the Building Science Council which summarizes it perfectly. He talks about how your outer system needs to have these four things to make a high performing wall, which he then goes on to show how that perfect wall turned sideways is also the perfect roof.
When we start to think about our roof, it’s helpful to think of it in layers. Each layer has an important function and the order matters. If we can get each layer right and in the correct order, we will have a great roof that will protect our tiny home.
The first thing a roof has to do is keep water off the rest of the structure with shingles, metal panels, etc. Water seeping into your tiny house will do a lot of damage, and ensuring a roof doesn’t leak when you have complicated dormers, valleys, or roof penetrations is no easy task.
 The next thing we want to do is control air flow through our system. This again seems straight forward — just seal it up. But having a perfect air seal transition from where the roof meets the top of your wall, going around air vents, and working around insulation can be quite tricky. Having a well air-sealed house is very important to having an efficient tiny house.
While many people focus on insulating their roof, air sealing will actually make a bigger difference. In fact, a well-sealed house that’s poorly insulated is dramatically better than a well-insulated house that is poorly sealed.
With air comes vapor and that moisture-laden air can lead to mold in your tiny house if not controlled. It’s often the case that the layer that prevents air from entering into your roof structure also is the same that prevents moisture from entering too, like with Tyvek or tar paper.
The last layer, and least important of them all, is the thermal layer. Insulating your tiny house roof is an important step to building your roof system, but won’t mean much if you can’t first control water, air, and vapor. The roof of your tiny home will need to be more insulated than your walls or floors because heat rises. Typically roof insulation is two to three times the R value of your wall insulation.
Vented Vs. Unvented Tiny House Roofs

A big decision to make about your roof is whether it is vented or unvented. The distinction is pretty obvious, but the details are again very important.
Vented Tiny House Roof

A vented roof allows for air to move along the underside of the roof, entering in the soffit vents and out the ridge vent. This is the traditional approach to building a roof and many benefits.
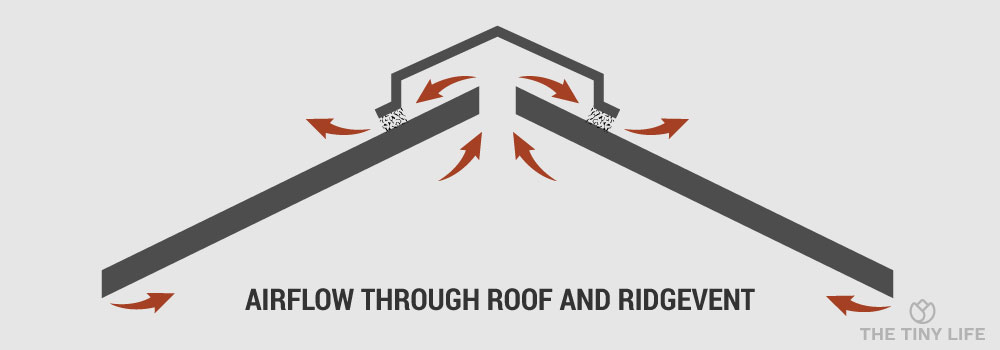
The natural air flow allows for any moisture vapor to be dried as the air flows through your vented roof. In the winter it keeps the bottom side of the roof the same temperature as the outside, which prevents ice dams. In the summer, when the heat from the sun is absorbed by your roof, a vented roof will actively cool the space between the roof and your insulation.
Unvented Tiny House Roof

An unvented roof is a sealed system that does not allow for air to move through it. This is a more modern way of building a roof and for tiny homes is the one I recommend. In a tiny house, you only have so much vertical height because of DOT rules. This means that if we were to vent our roof, we would have to give up internal space we’d otherwise use for living space to allow for venting, which is very limited to begin with.

An unvented roof is also easier to build in my opinion. While the details are important, I find there are fewer things to worry about. At the end of the day, an unvented roof is easier to build, is less complicated, and gives us more living space; that’s a win, win, win in my book.
Tiny House Roof Profiles

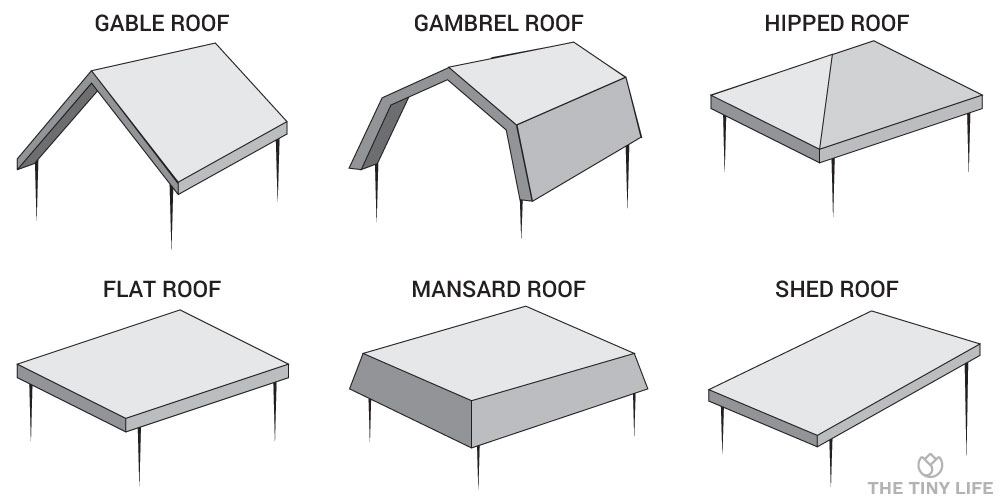
Like with any home, you have a lot of different roof profile options, and the shape and style of your roof can have a huge impact on the look and feel of your tiny home. For example, a flat roof will be more modern looking while a gambrel roof has more of a country or farm feel to it. A gable roof with clean lines will be more classic of a look and so on.
Your roof style will also impact the available space inside your house. A Gambrel roof tends to have the most internal space, but for my taste, I don’t love the look.
A flat roof can really lend to a more modern home design and is very simple to construct. If you feel overwhelmed by all the compound miter cuts of a hipped roof, a shed roof might your ideal approach. People often put the loft in the higher end so there is more space in their tiny house loft while the lower end is on the opposite side.
How To Frame A Tiny House Roof

Framing your tiny house roof is a big step and one that took me the longest when I built my own tiny home. The combination of having to climb up and down plus the complex angles that need to be cut meant it took me a while to get this right.
There are three main components to your roof framing: the top plate of the wall, your ridge beam, and the rafter that connects the two.
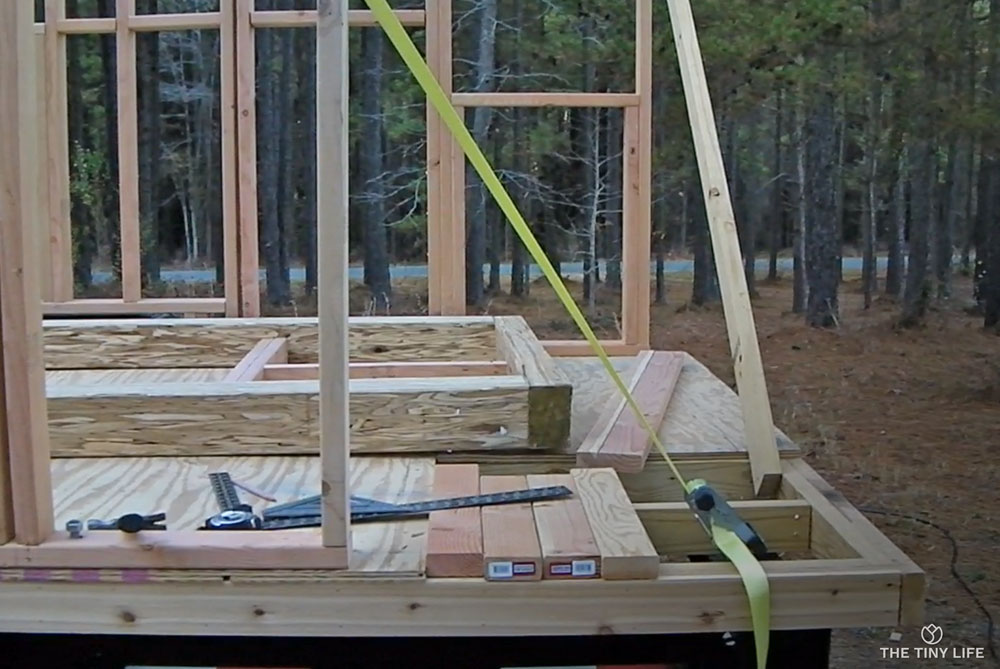
Step 1: Straighten Your Walls

First start by squaring your walls. It’s amazing how much your wall framing can move, so make sure that the wall is straight across its face. You should also check that the frame of the outside of the wall is square to itself. Check the plumb of the wall and each of its studs. Then finally make sure all the walls are square to each other.
You’ll no doubt find that your walls, despite being built properly, will be out of alignment in some direction. There are various techniques to push and pull your walls into square, but my go to was with ratchet straps. I applied the straps to pull the wall into alignment and added my sheathing to the outside (which we’ll talk more about soon). Then I could start to build my ridge beam.
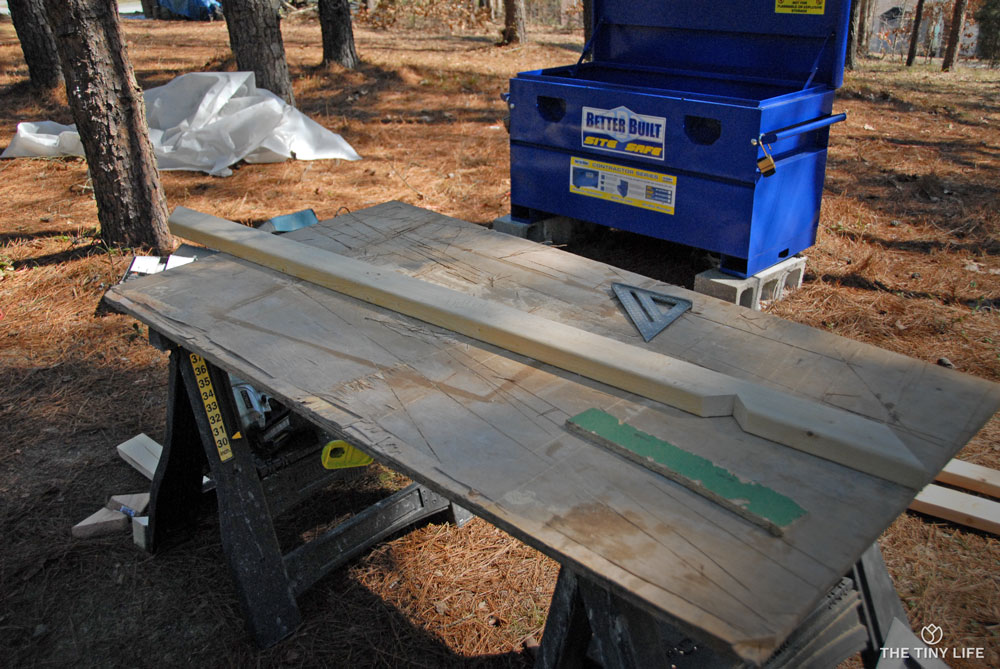
Step 2: Make A Rafter Template

This is another important step and one that will give you the most grief if you’ve done it wrong. It is vitally important that your walls are totally straight so that when you install these rafters, you can trust things to line up.
There are a lot of elements that go into cutting rafters. Boiled down, you have the rise of the roof (how tall it is above the wall), the run of the roof (how wide that side of the roof is), and the pitch (the angle of the roof).
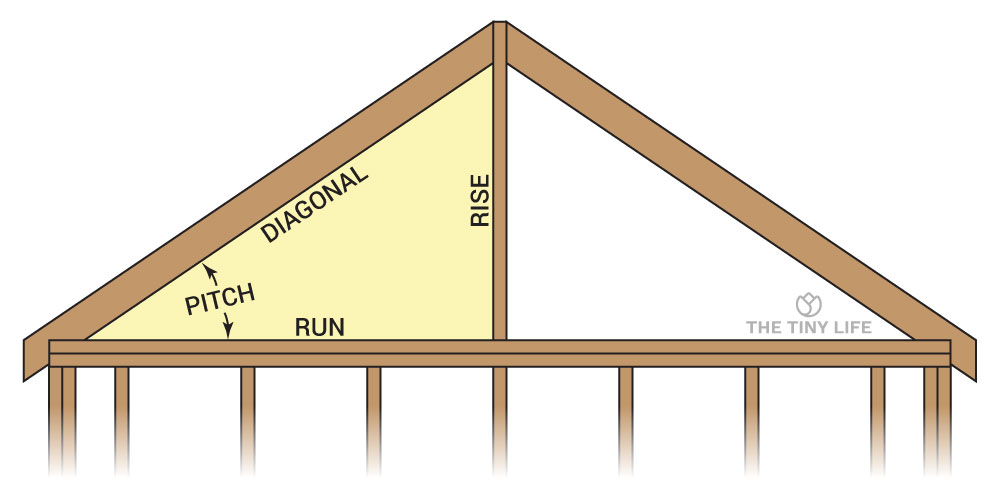
You’ll frequently hear about a “12/12 roof” or a “4/12 roof,” which essentially means for every number of inches of the first number, it will rise the number of inches in the second number. A 12:12 roof means that for every 12 inches of run it will rise 12 inches.
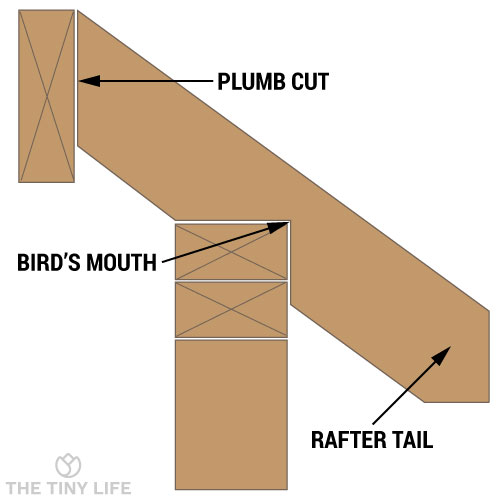
You’ll want to make a rafter template because it will ensure that all your rafters are exactly the same and speed things up. The angles of your rafter tail, bird’s mouth, and ridge can be tricky, so do yourself a favor and figure them out only once with your template.
You’ll use the template to make all your rafters ahead of time, then start installing them on the house. Don’t try to custom cut each rafter as you go or you’ll end up with a very uneven roof.
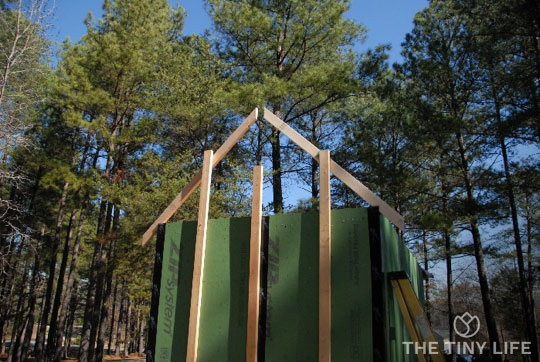
Step 3: Install Your Ridge Beam

Once you’re sure that everything thing is actually square, I start by installing a temporary 2×4 on the outside of the house to temporarily hold in place my first set of rafters and my last set of rafters. This establishes your start and end points to make sure that you’re placing them exactly in the right spot.
To those sets of rafters I install my ridge beam at both ends, checking that everything is straight and installed in the right place, and at the correct angles. Double (and maybe triple) check this because getting your rafters right at the start and end will set you up for success as you fill in the rest of the rafters.
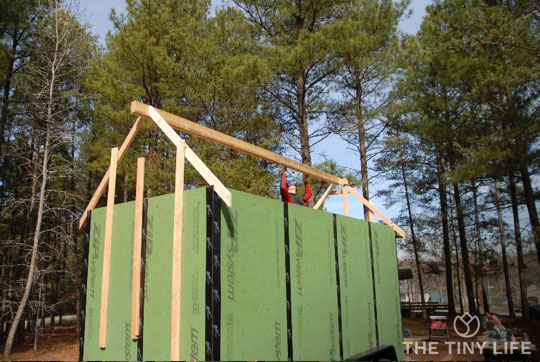
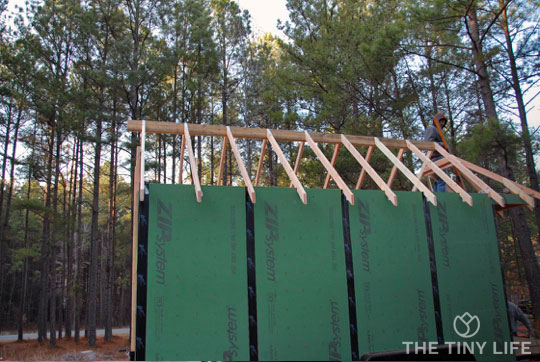
Step 4: Install The Middle Rafters

This part should be pretty quick because you’ve already done a ton of work ahead of time to make sure this exact step goes off without a hitch. You’ve straightened your whole tiny home, made all your rafters from the same template, and started the roof off on either end.
Part of the reason we do all of this is because often the ridge beam is a single piece of wood or two pieces laminated together. This undoubtedly means the ridge beam isn’t perfectly straight. Remember that lumber warps and twists, and I’ve found the longer the piece, the more warping it will have. Since we’ve made sure everything else is straight and plumb, we can use the rest of the house to index off of.
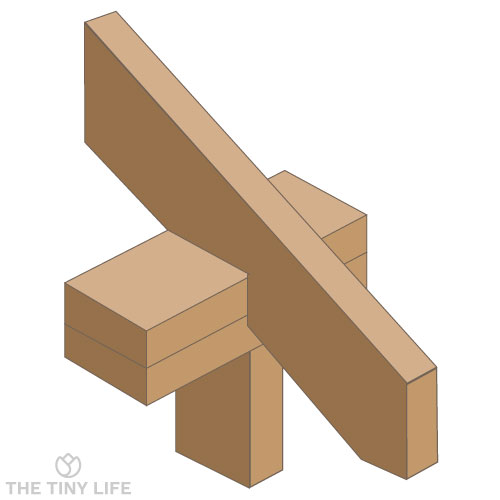
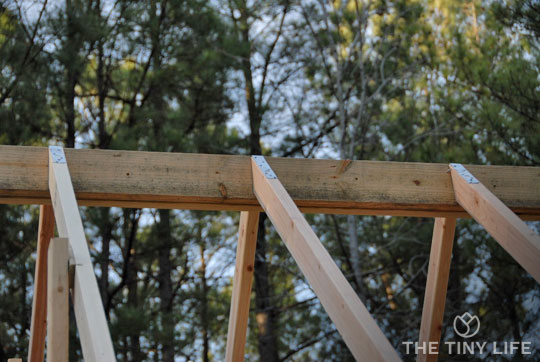
 As you go in and add your rafters, you’re going to physically push and pull the ridge beam into alignment with the rafters. Depending on the warping of the ridge beam, you’ll have to pull the ridge beam towards you or push it away so the plum cut at the top of the rafters lay flush on the beam’s face.
If the top edge of your plumb cut on the rafter rises above the ridge beam, you’ll have to pull it down to be flush, even going as far as hanging on it with your full weight. Alternately, you may need to push the ridge beam up a bit to get it to be flush — to do that I wedge a 2×4 between the ridge beam and the floor and lever it into place.
Keep in mind that all of this is totally expected and isn’t a problem, assuming you did all the leg work ahead of time to make sure everything else is straight.
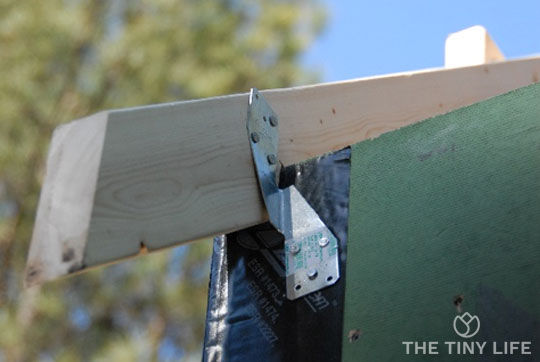
Step 5: Attach Your Hurricane Roof Ties

Even if your local code doesn’t require this, I suggest you do this step. Going down the road at 60 mph isn’t something that a normal home will do, but for a tiny house, it’s not uncommon. You’ll want to use Simpson Strong-Ties with the appropriate Tico nail to secure these in addition to your regular nailing and screwing.
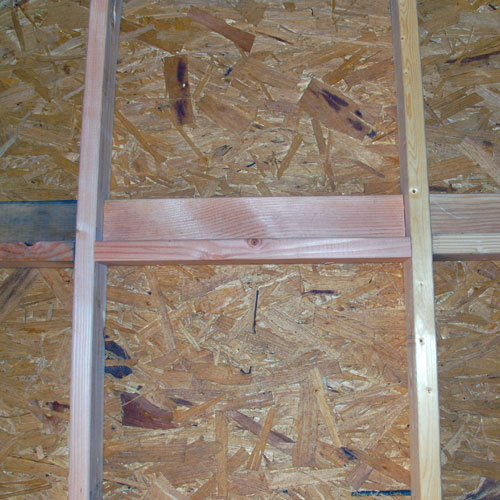
Step 6: Add Blocking For Attaching Your Roof Sheathing

How you lay down and attach your sheathing to your roof framing needs to be done in a very specific way. I go into it more in my How To Build A Tiny House guide. As you’re laying down your decking, you might find that the seams of your sheets don’t have wood right behind it to support the seam and to attach directly to with a nail, screw, or staple.
Here is the inside of my roofing, where I’ve added this extra blocking to support the roof decking seam (hidden from view by the blocking):
Step 7: Add Roof Decking

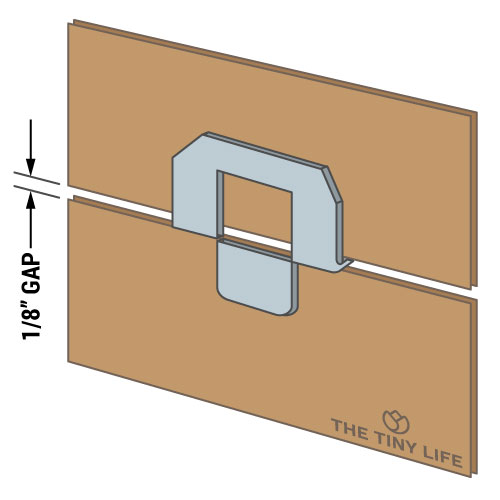 After you’ve added all your rafters, hurricane strapping, and checked that everything is square, it’s time to add your roof decking. Between your plywood or ZIP panels, you’re going to want to add roof clips. Add the panels to your roof decking and attach with the appropriate code-compliant fastener (local codes are very specific about this).
Step 8: Apply Underlayment

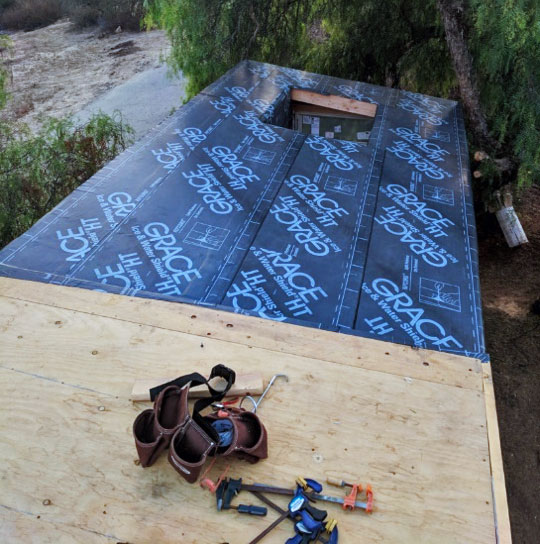
This is a layer of our roof system that is part of our water control layer, but can also cover your air and vapor control layers. Traditionally this would be done with felt paper, which is still a very commonly used option.
However, on a tiny house, because we have such a small area to cover, I’d suggest going with a self-adhesive roof underlayment like Grace’s Ice and Water Shield.
Since you only need one roll of this to cover your entire tiny house roof, it just makes sense to buy the best. Where a traditional roof’s size would be cost prohibitive, on a tiny house it only adds about $90 to the bill.
Step 9: Add Roofing Material – Metal Roofs, Asphalt Shingles, Etc.

An important thing to note here is that most underlayment is only designed to be exposed to UV rays for 30-60 days — anything longer than that and they can start to break down. When you get your roof decking on and sealed up, try to add the roofing material soon after.
Each of these options are going to have a different way of installing them, but make sure you follow your directions from the manufacturer and concentrate on getting transition points like ridges, valleys, and dormers right.
Broadly speaking, you want to think about how water will flow off your roof. Typically this means you’ll start your roofing at the bottom and work your way up, so that each preceding layer covers the bottom one. This allows for water to flow down and off your roof.
Tiny House Roofing Options

You’ll need to choose what type of roofing material you’re going to cover your roof decking with as there are several options for you to consider. I’ll start with my personal recommendation, then go on to other common ones.
Standing Seam Metal Roofs

Standing seam metal roofs are what I recommend to most people for their tiny house. Metal roofs are very durable, and standing seams (meaning the joints are off the plane where the water will run) have a huge advantage of hidden fastener points. What this means is that you can attach the roof to the decking without having that fastening point being exposed. Metal roofs are also much better at handling higher wind speeds.
PROS
- Very durable
- Long lasting: ~50 years
- Many color choices
- Hidden fastener
CONS
- Most expensive
- Tricky to install on complex roofs
- Requires a special order
- Asthetic not to everyone’s taste
Asphalt/Fiberglass Shingles

Shingles are a popular option because of how affordable and approachable they are. However there are two big drawbacks to shingles: they are known to blow off a tiny house as it drives down the road and they are heavy.
PROS
- Decently durable
- Affordable
- Widely available
- Easily installed
CONS
- Blow off going down the road
- Heavy: 2.5-4 pounds per square foot
- Not suitable for low slope roofs
- Prone to streaks and staining
Corrugated Metal – Through Fastener Panels

This is an attractive option that gives you the durability of a standing seam without the price. These panels are also widely available, so you may not even need to order them ahead of time. They’re also pretty easy to install, which is done by driving a rubber gasketed screw through the face of them. The fact that you attach them by driving a screw through the surface is the biggest drawback, as you’re essentially poking hundreds of holes into your roof, which isn’t a great idea.
PROS
- Affordable
- Durable
- Widely available
- Easy to install
CONS
- Through fasteners can leak
- Slightly higher cost
- Requires cutting metal
- Tricky to do transition points
Other Tiny House Roofing Options
There are of course many more roofing options like wood shingles, slate roofs, terra cotta tiles, composite panels, copper roofing, etc., but they all have more drawbacks than positives. In general, I suggest standing seam metal roofs for all tiny houses because of their hidden fasteners, high wind rating, and overall durability.
Tiny House Minimum Roof Pitch

An important consideration for your tiny house roof is the minimum roof pitch or angle. General advice is that your roof should have at least a 2/12 pitch, meaning for every foot of run, your roof will rise 2 inches. You can go shallower or even flat with an EPDM roof (similar to a pool liner material), but these end up being a lot of extra work as they require the details to be done just right and, as I’ve heard from my tiny house friends with flat roofs, tend to leak.
I’d advise people to stick to at least a 4/12 pitch to be on the safe side. This is mainly because a tiny house might not always be level depending where you park it, and a tiny house that is slightly out of level with a roof pitch of, say,2/12 might be canted enough to one side to allow water to pool on your roof.
Tiny House With A Garden On Roof / Green Roof

From time to time, people ask about having a green roof or a tiny house that has a roof-top garden. People are attracted to them because they’re an interesting element, help reduce heat absorption, don’t contribute to the heat island effect in cities, and add green space to what is normally an unused space.
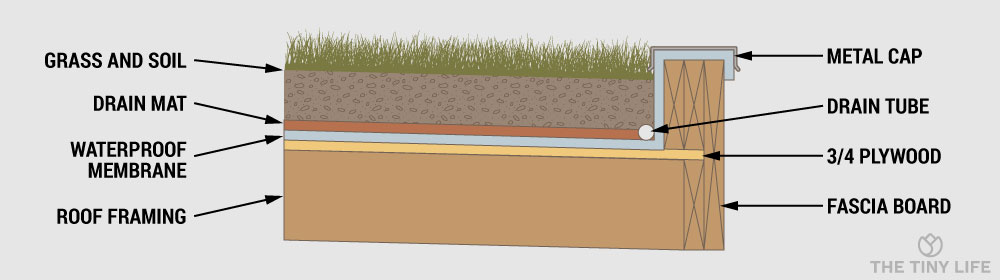
It is important to understand that these types of roofs are often very heavy. If you’re thinking about building a tiny house on a foundation, this could be a really good option. But if you want a tiny house on wheels, this is most likely going to be too heavy for your trailer or, at the very least, you’re going to have to calculate the additional load and get a trailer with a higher weight rating.
Your Turn!
- What are you going to do for your tiny house roof?
I am looking for information on the construction of a rooftop patio. Any suggestions, websites, videos or ideas would be much appreciated. Thanks 🙂
THANK YOU for this information. Hard to find details like this, we are framing our trailer out this weekend and were looking for more information on rafters, happy we stumbled upon this.
Interesting article about roofs for tiny houses! Roofer Berlin CT For compact living areas, a strong roof is essential, and this article provides great advice on how to use the available space.
For More Info:- https://zamanroofing.com/roofer-berlin-ct/